In this scenario, let’s say you’re using a Gravity Forms form on your website as an optin, collecting emails in exchange for an ebook. No need to fuss with an email marking system, get your users their ebook as soon as they click submit!
This is a very simple solution, that is easy to setup and easy to use. I’ll provide everything you need in this very detailed, step-by-step tutorial.
Rather use a plugin? Don’t want to mess with code? Checkout this solution: Notification Attachments for Gravity Forms Plugin Review (code free method)
These are a few benefits to this solution:
- The ebook file does not need to be stored in your media library
- You do not have to provide a download link
- You do not have to use an email marketing service (i.e Mailchimp)
- You only need one plugin
This is What You’ll Need
- Gravity Forms (any license)
- Functionality Plugin (free)
- The Code (provided below)
That’s it! Like I said, this is a simple solution.
If you do not have a Gravity Forms license, please head on over to gravityforms.com/pricing to get yours so that you can download the plugin, it is required for this to work ;-).
Alright, now this tutorial starts off with the assumption that you already have Gravity Forms installed and activated. If you are not sure how to do that, please refer to the video here.
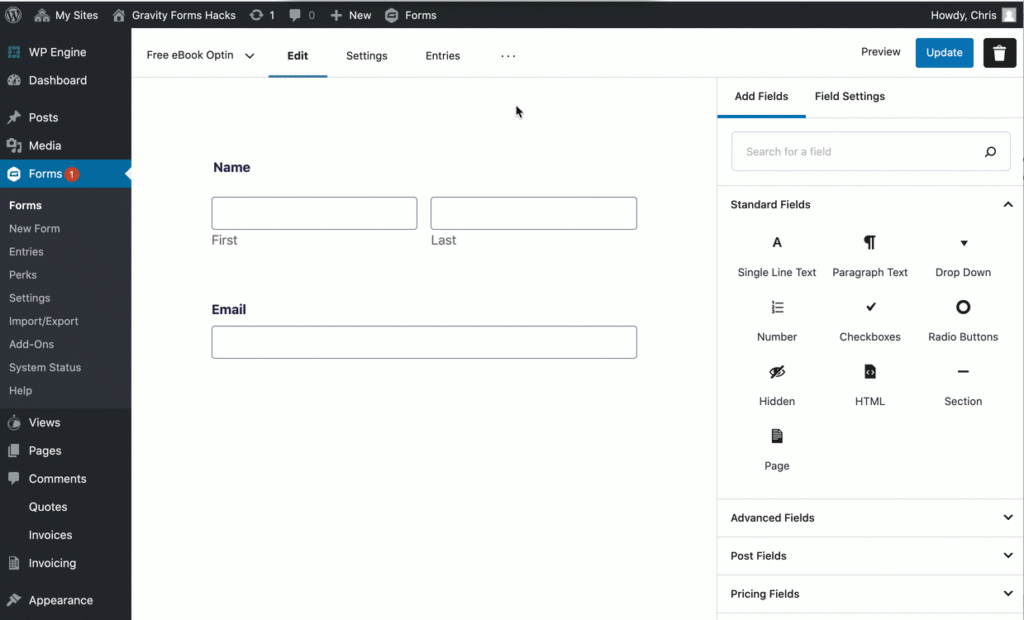
Step 1: Creating your form
If you have already created your form, feel free to skip to the next step in this tutorial.
- Got to Forms => Add New
- Name Your Form “Free eBook Optin”
- Click ‘Create Form’
- Add Your Fields:
- Name
- Click Update

Step 2: Setting up your notifications
By default, when you create your form, Gravity Forms will automatically create an admin notification, which is set to send you an email every time the form is submitted.
In this scenario, we need to add a notification to send the ebook to the subscriber. This step walks you through setting up a new notification. You can edit the admin notification if you’d like. However, I will not cover that in this tutorial.
- Go to Settings => Notifications
- Click ‘Add New’
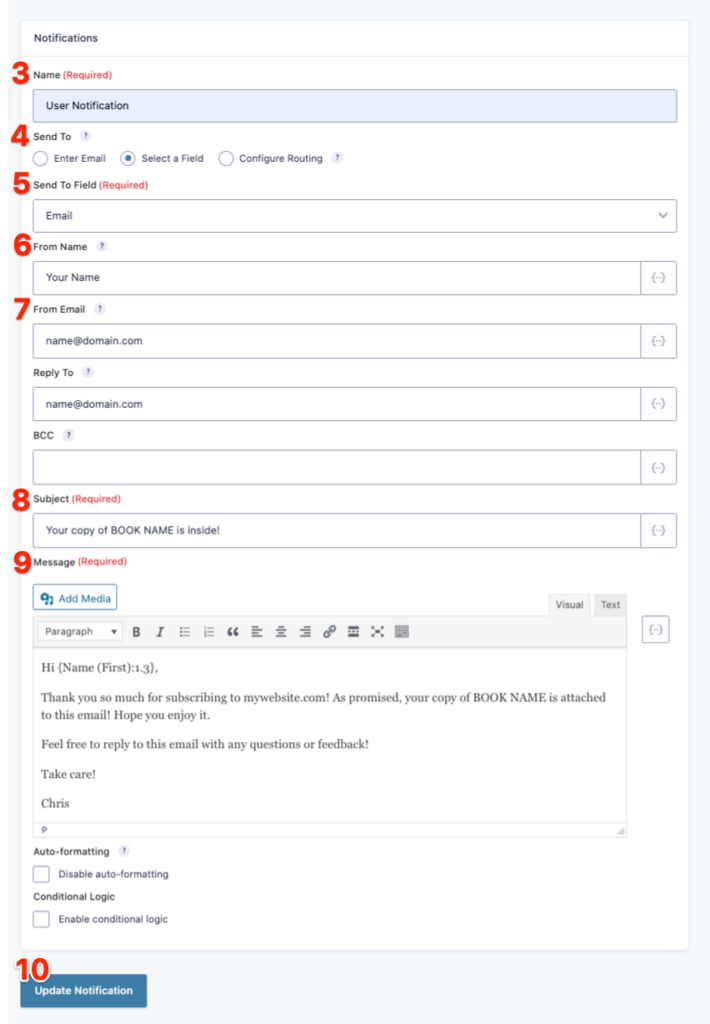
- Name your notification “User Notification”
- Send To use ‘Select a Field’
- From the ‘Send To Field’ dropdown, select ‘Email’
- From Name: Put your name
- From Email: Use your domain email (i.e chris@mydomain.com)
- Subject: “Your copy of Book Name is inside!”
- Message: Create a custom message, you can use merge tags to pull in the users name and any other information you collected through the form.
- Click ‘Update Notification’
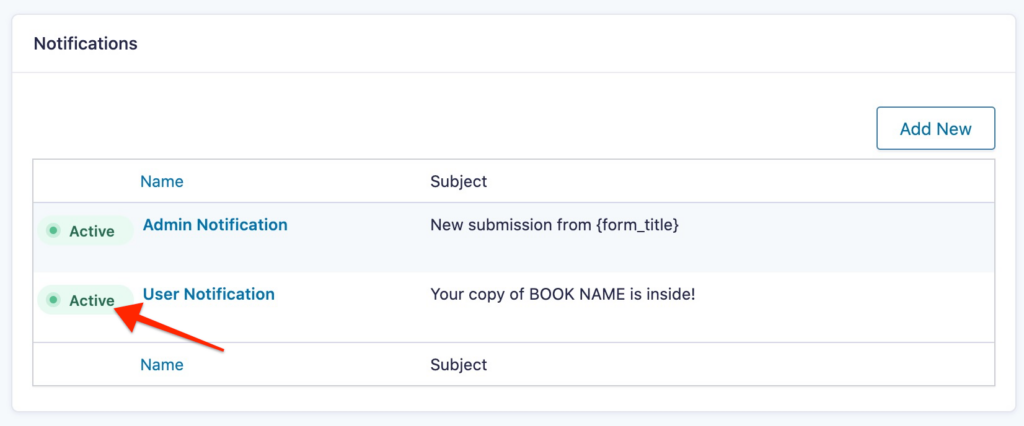
- Make sure your new notification is Active
Step 3: Adding the form to a page
There are a couple ways to add your form to a page depending on which version of the WordPress page editor you use or if you use a third party page builder.
In this tutorial, I will only be showing you how to add the form to your page with the WordPress Block Editor. However, if you need to know how to add your form to a page with the Classic Editor click here.
If you are using a third party page builder like Elementor, I highly recommend using the Essential Addons plugin, you’ll be glad you did!
- Edit or Add your page
- Click the + icon
- Click the Gravity block
- Select your form
- Update or Publish your page

Step 4: Implementing the code
This step has three parts. You will need to install the Code Snippets plugin, copy the code below, paste it into the plugin, make a couple of modifications, and be done!
Part 1: Install the Code Snippets plugin
- Go to Plugins => Add New
- Search for Code Snippets
- Click Install
- Click Activate

Part 2: Adding the code to your site
You will need to copy and past this code into the plugin you just installed.
- Copy the code above
- Go to Snippets => Add New
- Title you snippet “Ebook Attachment”
- Past the code in the ‘Code’ area
- Click ‘Save Changes’

Part 3: Modifying the code
- Replace 1 in the gform_notification_1 line, with your form ID
- Change ‘User Notification’ to the name of your notification (if you named your notification something different)
- Add the path to your file
- Click Save Changes and Activate
Step 5: Testing. Always Test!
This is an important step that so many people leave out, do NOT skip this step! You want to make sure it is working before you start driving traffic to your optin form.
To test this, go to the page you embedded your form on, fill out the form, and click submit.
If you get an email with the attachment you know it worked! Well done!
If you do NOT get an email, or if the email does not have an attachment, below are a few common causes.
- Your file path is invalid
- Didn’t change the ID number in the code
- Entered the wrong ID number
- Didn’t change the notification name
- Entered the wrong notification name
- You’re email was entered wrong
- You’re checking the wrong email address
If after checking the recommended items above, this is still not working, please use the chat or comments below for additional help.
Optional: Using a third party SMTP service
To improve the deliverability of you notifications, especially if you use a cheap hosting service like GoDaddy or Bluehost, you may want to consider using an SMTP service provider.
When you use one of these third party solution, you bypass your hosting services email servers and instead your emails are sent through one of these third party mail servers.
Gravity Forms integrates nicely with a couple of these services by providing add-ons available with any license.
While I recommend using one of these services above, there are several others to choose from and there are several WordPress plugins available for integrating with these and the other SMTP service providers.
Optional: Integration with an email marketing service
I already mentioned that you do not need to use an email marketing service, however, if you’d like to have these new subscribers added to a list in your email marketing account you can easily do that with Gravity Forms and several platforms.
This is a list of official integrations provided by Gravity Forms:
- ActiveCampaign
- AWeber
- Campaign Monitor
- CleverReach
- Constant Contact
- EmailOctopus
- Emma
- GetResponse
- HubSpot
- iContact
- Mad Mimi
- Mailchimp
If you are interested in learning how to integrate Gravity Forms with an email service provider, you can watch this video tutorial, How to Create a Mailchimp Signup Form, to learn how it works.
The Wrap Up
By now I hope you see the power in this simple solution. With this you can do more to power your online business without the need for another plugin or another platform, all you need is Gravity Forms.
Subscribe to our blog for more articles like this and if you need additional help, please use the comments below.
This is awesome. Is there a way to set the $path to the value of a hidden field on the form?
What if I the file to attach is located on a remote URL and not in the same server?
If I simply change
$path = ‘path/to/file.pdf’;
with
$path = ‘https://cdn.myexternalserver.com/the_attached_file.pdf’;
it doesn’t work.
Thanks a lot!
Very good tutorial and including all the reasons to check if it’s not working. Thanks!!
Hey mate, awesome! Worked first time.
Trying to add it to another form with the exact same attachment. Did everything the same but its giving me this error?
The snippet has been deactivated due to an error on line 8:
Cannot redeclare function add_notification_attachments.
No idea why?
Hi Garo,
Essentially that error indicates that PHP can not handle processing the same function twice. A way to work around that is to modify the function…
i.e you could add the form ID to the function as shown below and in this screenshot:
https://docs.wprescue.me/Qwu462rx
[code]
add_filter( ‘gform_notification_43’, ‘add_notification_attachments_43’, 10, 3 );
function add_notification_attachments_43( $notification, $form, $entry ) {
if ( $notification[‘name’] == ‘Admin Notification’ ) {
$path = ‘wp-content/uploads/2021/09/sample.pdf’;
$notification[‘attachments’] = array( $path );
}
return $notification;
}
[/code]
Let me us know if that works for you!
ah ok, so you mean add it to the single instance of the working function. So just add that filter above and make the notification as the other GF 🙂 correct?
This is brillant. and works perfectly. Thank you so much Chris. Real life savier.
If someone is looking at this and have various attachments depending on the notification, just copy/paste the IF paragraph in the same snippet (and edit the name of the notification and the path to the file of course) Works perfectly as well.
Thanks again !