Gravity Forms is a pretty advanced tool that will enable you to create a variety of forms and with some custom code or an available add-on, you can get pretty creative.
It seems more and more people are looking for ways to build Sales Funnels with their WordPress site, and I think many have either tried Click Funnels or seen some of the two step order forms you can build with Click Funnels and they want to do the same thing with their WordPress site.
You probably already know you can use Gravity Forms to collect payments, what you may not know is that you can create multi-step checkout forms and even order bumps with Gravity Forms.
In this article I’ll show you how you can do this with Gravity Forms multi-page feature, but I also wanted to show you how you can use a third party add-on to give you more options for building multi-step order forms.
That add-on is called, Collapsable Sections, and it is developed by a certified Gravity Forms developer, Jetsloth.
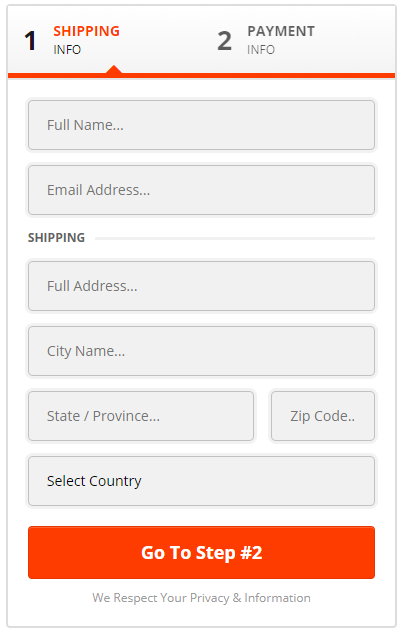
Multi-Step Checkout Form with Auto Advanced Sections
This form is much like a conversational type form, allowing your user to focus on one section of data at a time. Walking them through the checkout process, starting with the basic user info then moving onto the payment details.
If you use the Partial Entries add-on, you will be able to capture the users info even if they abandon the purchase. This would allow you to add those users to an abandon cart followup funnel.
Form Demo:
You’ll notice that you can not manually advance through this form until you have gone through the auto advance once. This is a nice feature, it will make it easier to keep the user focused and from getting overwhelmed.
This form requires that each section have a radio button field and some custom JavaScript to handle the auto advance functionality.
You can find the complete tutorial, including form JSON files you can download and import into your site for quick implementation here.
Multi-Step Tabbed Checkout Form
I’m sure you’ve seen the two step checkout form made popular by the Click Funnels website builder:

Well with the same Collapsible Sections add-on you can accomplish something similar. Depending on your CSS skills you could probably even create an exact replica.
Form Demo:
You’ll notice that in this demo, I have even incorporated an “order form bump” on the last step of the form, it’s just a checkbox field and a hidden product field with some custom CSS.
Like in the other example, if you are using the Partial Entires add-on, you will be able to capture the users information even if they abandon the order.
You can find the complete tutorial, including form JSON files you can download and import into your site for quick implementation here.
Note: that tutorial does not include how to add the order form bump that I have demoed in the video above.
2 Step Order Form with Multi-Page
Yes, you might be thinking, I don’t really need the Collapsable Sections add-on, I can just create a multi-page form with Gravity Forms to accomplish the same type of multi-step forms.
That is true, and I have even created one of those to demo below. However, I like this add-on because it provides more options.
Let’s take a look at the form built with Gravity Forms multi-page.
Form Demo:
You can take the custom design even further by changing the steps at the top to tabs and narrowing the form box to look more like the official Click Funnels 2 step form (example below).
If you want to know how I do the order form bump and the order summary in this demo, let me show you.
The Order Bump
The order bump uses a checkbox field, a single product field and some custom CSS.

The product field is hidden using the gf_invisible CSS class. This class hides the product field but allows it to still be used in the form total.

The product field also uses conditional logic. The logic is important, it prevents the order bump product from being applied to the total until the user checks the box “Yes! Add It To My Order”.

The checkbox field is the field that we applied the custom CSS to. The CSS below can be used for your form, but you will need to change the selector (i.e. fieldset#field_18_9). You should be able to switch out the 18_9 with your forms ID#_field#.
fieldset#field_18_9 {
	border: 5px dashed black;
	background-color: yellow;
	text-align: center;
	padding: 25px;
	font-size: 22px !important;
}
I recommend adding this code to the WordPress Customizer (Appearance > Customize > Additional CSS).
The Order Summary
The order summary uses two HTML fields with an HTML table, some basic CSS, and conditional logic.
NOTE: you may need more CSS to make this look good, but it depends on the theme your site uses. Gravity Forms adapts your theme CSS for much of its design as of version 2.5.
The only difference in the HTML field value is that the second one adds the order bump product/price to the table and adjusts the total amount.

This is the code for the first HTML field:
<p style="font-size: 22px; padding: 15px 0 5px; border-bottom: 1px solid #ccc;">Item</p>
<table style="width: 100%;">
<tr>
<td>Book</td>
<td style="text-align: right;">FREE</td>
</tr>
<tr>
<td>Shipping</td>
<td style="text-align: right;">$7.95</td>
</tr>
<tr style="background-color: #f2f2f2;">
<td>Total</td>
<td style="text-align: right;">$7.95</td>
</tr>
</table>
This is the code for the second HTML field:
<p style="font-size: 22px; padding: 15px 0 5px; border-bottom: 1px solid #ccc;">Item</p>
<table style="width: 100%;">
<tr>
<td>Book</td>
<td style="text-align: right;">FREE</td>
</tr>
<tr>
<td>Shipping</td>
<td style="text-align: right;">$7.95</td>
</tr>
<tr>
<td>Audiobook</td>
<td style="text-align: right;">$40.00</td>
</tr>
<tr style="background-color: #f2f2f2;">
<td>Total</td>
<td style="text-align: right;">$47.95</td>
</tr>
</table>
The conditional logic for the first HTML field is shown below:

The conditional logic for the second HTML field is shown below:

Download the Form Template
It’s 100% FREE!

The Wrap Up
Now that you have a couple of examples, and some really good solutions to make building multi-step order forms for your WordPress website even easier, you should be able to incorporate these forms into your sales pages.
I have a few guides that show you how to embed your forms if you’re using a page builder like the ones listed below:
If you need any additional help feel free to reach out using the comments below.