Gravity Forms notification feature allows you to send emails to users automatically when they submit a form. This is useful for sending confirmation messages, receipts, or follow-up emails.
The only problem is that when your form, Gravity Forms only creates an Admin Notification by default.
The only exception to this is if you use one of the form templates from the form library when creating your new form.
In this tutorial, I’ll guide you through setting up a notification that gets sent to the person filling out the form.
Step 1: Navigate to Your Form’s Notification Settings
- In your WordPress dashboard, go to Forms > Forms > Select the form you want to set up a notification for.
- Click on Settings > Notifications.
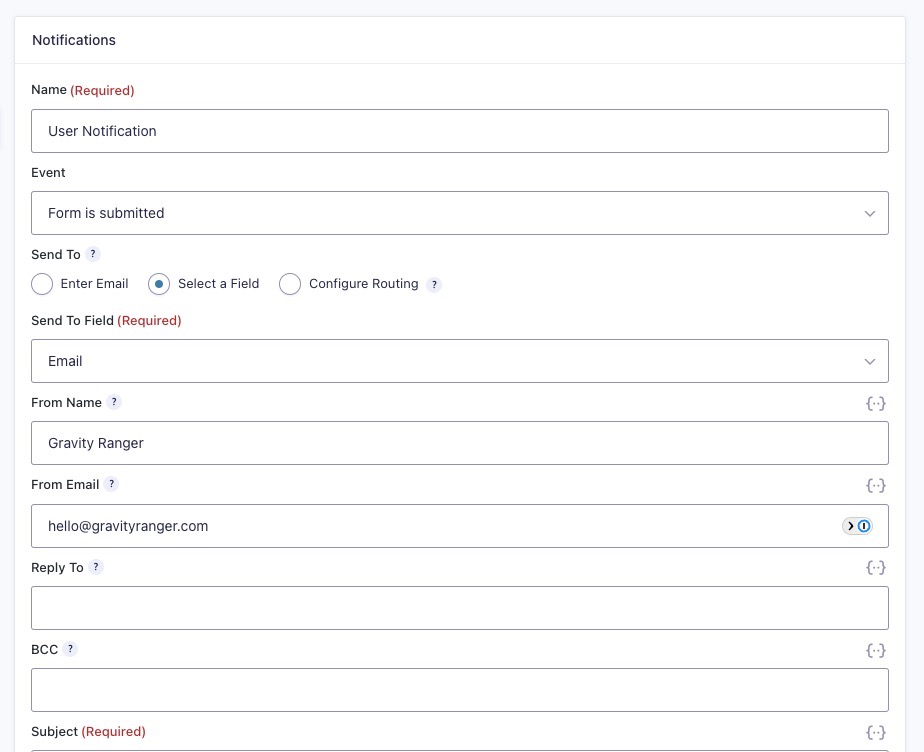
By default, Gravity Forms creates an admin notification when you build a form. We’ll add a new one specifically for the user.
Step 2: Create a New Notification
- Click Add New at the top.
- Give your notification a name, like “User Notification.”
PRO TIP: You can send multiple notifications at a time and you can even use conditional logic to determine when a notification is sent, so if you need a custom message based on the users inquiry you can do that!
Step 3: Set the Notification Recipient
- For the Send To choices, choose Select a Field.
- A new dropdown will appear. Select the Email Field from your form where users enter their email. This ensures the notification goes to the email address they provided.
PRO TIP: If you want to create another notification to send an email to a static email address (e.g., a team member), choose “Enter Email” and type in the email manually.
Step 4: Customize the Email Subject and From Details
- From Name: Use your business name so recipients recognize who it’s from.
- From Email: Use an email that matches your website’s domain (e.g., support@yourwebsite.com) to prevent spam issues.
- Reply To: If you want users to reply to a different email than your FROM email address, add that email here.
There are other settings, like BCC/CC, but for this use case we won’t need to set all of those, and they’re not required so it is ok to leave them blank.
Step 5: Write the Email Message
- In the Message box, craft your email. You can use merge tags (click the {..} button) to dynamically pull data from the form to create a custom message.
Example:

	Subject: Thank You for Your Submission, {Name:1.3}!

	Body:
Hi {Name:1.3},

Thanks for submitting your request. We’ve received your form and will be in touch soon. Here’s a summary of your submission:
	•	Name: {Name:1.3}
	•	Email: {Email:2}
	•	Message: {Your Message Field:3}

	If you have any questions, reply to this email.

	Best,
Your Name /Company Name- Click Save Notification when you’re done.
PRO TIP: Do not just copy and paste this example into your notification without making changes to the merge tags. Each field has a unique ID number and if it does not match the ID number in the merge tag, it will not work. Be sure to use the merge tag selector {..} to get the right merge tags for your form.
Step 6: Test Your Notification
- Submit a test entry using your form.
- Check the email inbox of the test address to ensure the notification arrives properly.
- If it doesn’t arrive:
- Check spam/junk folders.
- Ensure your WordPress site is properly sending emails (use a plugin like Gravity SMTP if needed).
PRO TIP: Most issues with notifications not sending are caused by not using best practices when setting up your TO and FROM email address. Be sure to review this troubleshooting guide to make sure you’ve got things set up correctly.
Bonus: Advanced Customization
For more advanced users:
- Conditional Notifications: Only send emails based on certain form responses. You can learn more about setting this up here: Enabling Conditional Logic for Notifications
- HTML Formatting: You can use HTML in the message body for branded emails and to build a completely custom email template: Creating Customized Form Notification Emails
- Third-Party Email Services: Instead of relying on Gravity Forms and your mail server to send these emails you could use Gravity Forms add-ons to send emails via Mailchimp, Brevo, or SendFox instead.
The Wrap Up
And that’s it! Now, whenever someone fills out your form, they’ll get an instant email, giving them peace of mind that their submission went through. It’s a small touch, but it makes a big difference in building trust and keeping things professional.
If you’re just getting started, this setup is all you need. But if you want to take it further, you can play around with custom HTML, conditional logic, or even connect to a third-party service. And if emails aren’t showing up, an SMTP plugin like Gravity SMTP can help make sure they land in inboxes instead of spam folders.
Give it a try, test it out, and tweak it to fit your style. You’re now one step closer to making your forms work smarter for you! 🚀