
Gravity Forms can’t import entries on its own: Import/Export only imports forms. To bring in entries from a spreadsheet (CSV), use GravityImport by GravityKit. To copy entries from one site to another, the free, official Gravity Forms CLI add-on can export and import them as JSON. I tested both, and the import itself was the easy part. The surprises were in what quietly didn’t come across, so read the “Things that silently go missing” section before you import anything that matters.
Your Options for Importing Entries
| Method | Best for | Imports from | Cost |
|---|---|---|---|
| GravityImport (GravityKit) | Spreadsheets, other form plugins, old systems | CSV, mapped to your form’s fields in the browser | $99/year, or included in GravityKit’s All Access |
| Gravity Forms CLI (official) | Moving entries between two copies of the same form | JSON exported by the same CLI | Free |
| Database copy | Developers moving a whole site’s entries | The gf_entry and gf_entry_meta tables | Free, but easy to get wrong |
There’s also a free plugin on WordPress.org called “Import entries for Gravity Forms” (a small developer, about 600 active installs). I haven’t tested it, so check its reviews and last update before relying on it.
Method 1: Import a CSV With GravityImport
For my test, I imported six quote requests exported from WPForms into a Gravity Forms version of the same form: names, email, phone, a dropdown, a checkbox field, a budget, a website and a message, plus the original submission dates.
1. Get your CSV ready
- One row per entry and one header row with a column name for each field.
- Split full names into First Name and Last Name columns. Gravity Forms stores them separately, and most exports (WPForms included) put the whole name in one column.
- Checkbox answers can stay in one cell separated by commas (“Design, SEO”). GravityImport splits them.
- Keep the original date column if you want entries to keep their real submission dates.
- Delete or rename any “Entry ID” column unless you mean to replace existing entries (more on that below).
2. Upload it and choose a form
Go to Forms → Import/Export → Import Entries (GravityImport adds this tab), drop in the CSV, and choose An Existing Form or Create a New Form. Creating a new form builds a basic form from your columns, which is handy for archiving old data, but for live forms import into the form you’ll actually use.
3. Map columns to fields
GravityImport matches columns to fields with the same label, and you set the rest from each dropdown. A preview of the first rows sits beside each column, so you can see straight away if something is mapped to the wrong field. Each field input gets its own option (First, Last and so on), and a checkbox field has an “(Any Choice)” option that takes the comma-separated cell.
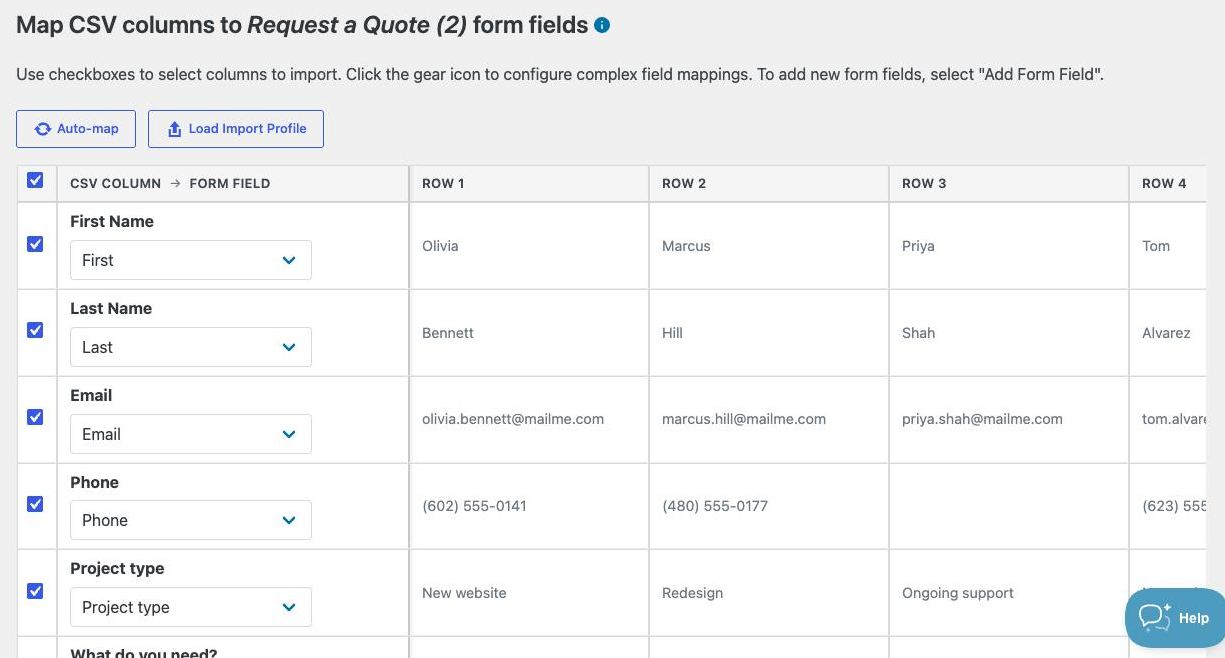
Map your date column to Entry Date to keep the original dates. There are also mappings for entry status, starred, read, user, IP and payment details if your CSV has them. You can save the mapping as an import profile and load it next time.
4. Choose the import options
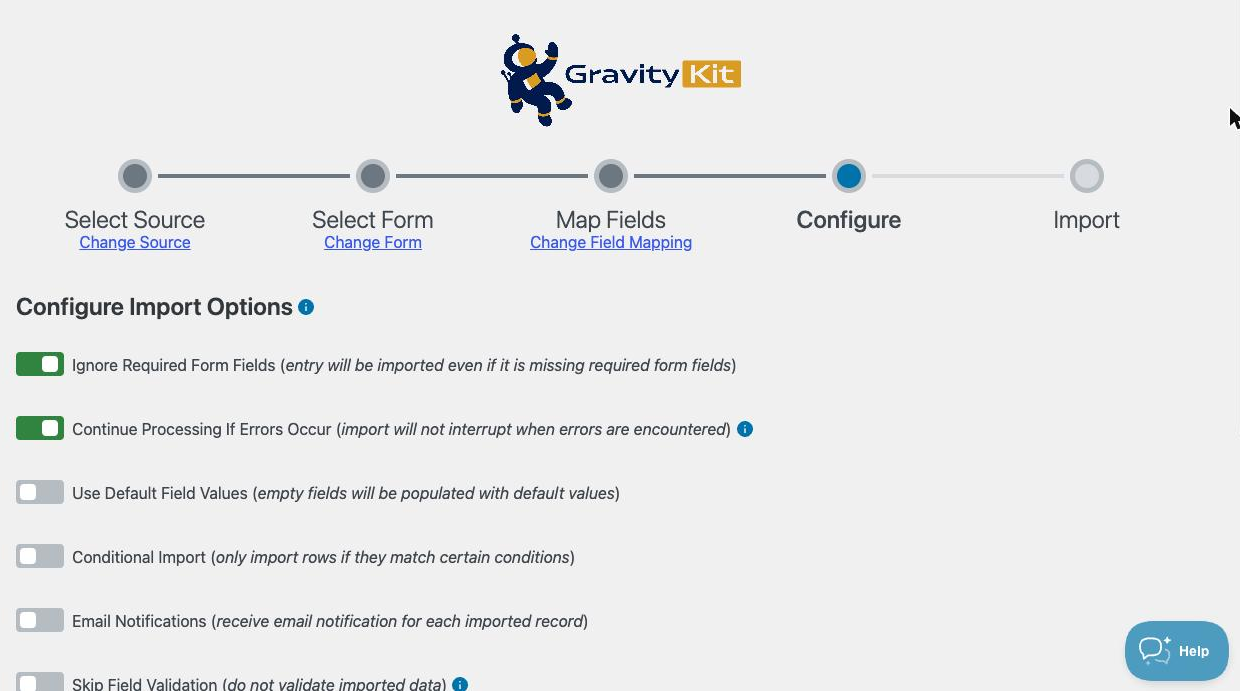
- Ignore Required Form Fields (on by default): rows missing a required value still import. Good for old data where a field didn’t exist yet.
- Continue Processing If Errors Occur (on by default): bad rows are set aside and you can fix and retry them afterwards.
- Conditional Import: only import rows that match rules, for example only one year’s entries.
- Email Notifications: off by default, which is what you want. Turning it on sends the form’s notifications for every imported row.
- Ignore Field Conditional Logic: read the next section before deciding.
5. Import and check the entries
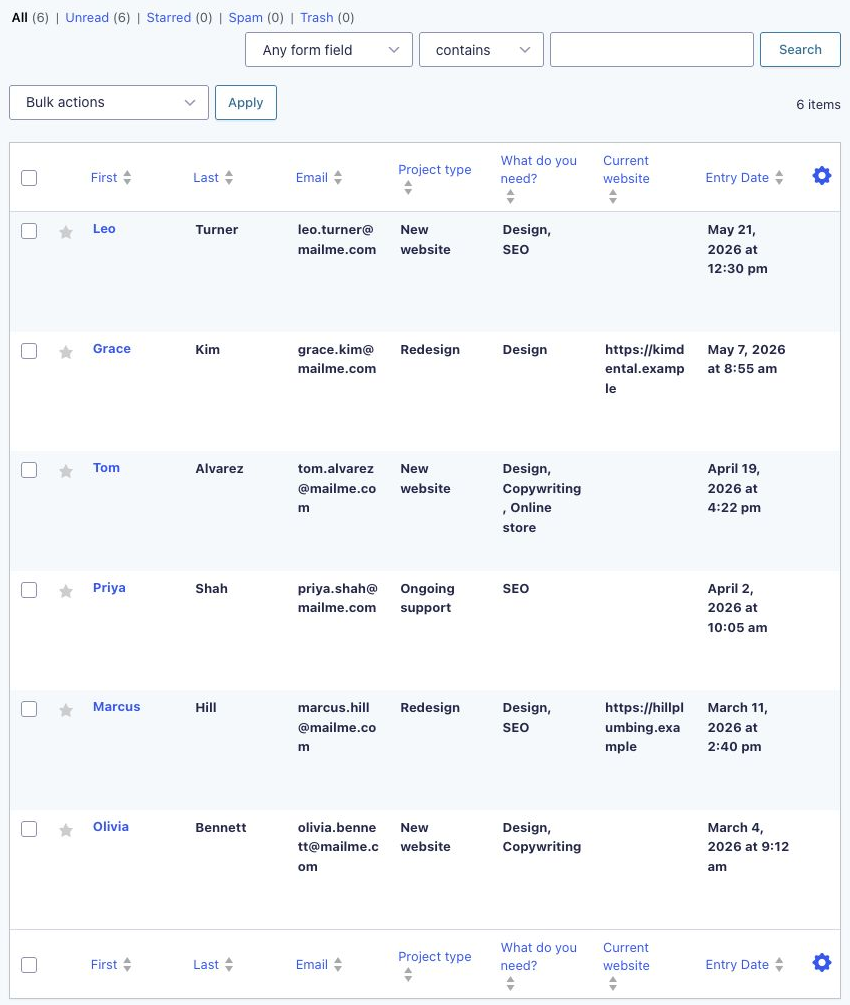
Click Continue With Import. Small files finish in seconds. My six rows came in with every answer and their original dates:
Things That Silently Go Missing
My first import reported six rows processed with no errors, yet two columns were empty on every entry. Nothing warned me. Here’s why, and what to check:
- Fields hidden by conditional logic are skipped. If a field only shows when another answer is chosen, rows where it would be hidden lose that value, even if the CSV has it. In my test, a customer who chose “Ongoing support” had a website in the CSV, but the Website field only shows for redesigns, so it wasn’t imported. Turn on Ignore Field Conditional Logic to keep those values.
- Choice answers must match the field’s choices. Dropdown, radio and checkbox values are matched against the choice values, not just the labels. My first target form (created by a migration tool) had choices with empty values, so every checkbox answer was dropped. Open each choice field and make sure the choices have values that match the text in your CSV.
- An “Entry ID” column replaces entries. GravityImport maps it automatically and shows a warning: an imported row with an ID that already exists overwrites that entry. That’s useful for bulk-updating entries you exported from the same form, and dangerous with an export from another plugin, whose IDs mean nothing in Gravity Forms. Unmap it.
Before importing hundreds of rows, import three, open them, and compare them with the spreadsheet field by field.
Method 2: Copy Entries to Another Site With the Gravity Forms CLI
If both sites have the same form (export the form from one and import it into the other first), the official Gravity Forms CLI add-on can move the entries. On the old site:
wp gf entry export 12 entries.jsonCopy entries.json to the new site and run:
wp gf entry import 5 entries.jsonReplace 12 and 5 with the form IDs on each site. In my test, all six entries came across with every value and their original dates, and got new entry IDs on the new form. The import reads JSON only (not CSV), and it adds entries by field ID, so the two forms need the same field IDs. Exporting the form and importing it on the new site keeps them identical. You’ll need WP-CLI access on both sites, which most managed hosts offer over SSH.
Moving From Another Form Plugin?
Move the form first, then the entries. I tested both WPForms migration tools and the entry import in Gravity Forms vs WPForms, including what each one gets wrong. One thing to know up front: WPForms Lite doesn’t save entries at all, so there’s nothing to export unless you had a paid WPForms plan.
Things to Know
- Back up the database before a large import. Imported entries can be deleted in bulk, but overwritten ones can’t be brought back.
- File Upload fields hold links to the files. If the files live on the old site, copy them across and check the links still work after the move.
- Payment details import as data only. No charges are made and no subscriptions are created.
- GravityImport relies on MySQL. It doesn’t process imports on sites that run WordPress on SQLite, such as WordPress Studio or Playground test sites, so test on a copy of your real hosting.
Frequently Asked Questions
Can Gravity Forms import entries from a CSV?
Not on its own. Gravity Forms can export entries to CSV and import forms, but importing entries needs an add-on such as GravityImport.
How do I move Gravity Forms entries to another site?
Import the form on the new site first, then either export the entries to CSV and import them with GravityImport, or use the free Gravity Forms CLI: wp gf entry export on the old site and wp gf entry import on the new one.
Do imported entries keep their original dates?
Yes, if you map your date column to Entry Date in GravityImport. The Gravity Forms CLI keeps the dates automatically.
Will importing entries send notifications?
Not by default. GravityImport only sends notifications if you turn on its Email Notifications option.
Why are some columns empty after importing?
Usually because the field is hidden by conditional logic for that row, or because the choice values in the form don’t match the text in your CSV. Turn on Ignore Field Conditional Logic and check that each choice has a value matching the CSV.
Need More Help?
If you still need help, use the chat or leave a comment below and we’ll get back to you.
Comments