To connect Gravity Forms to ClickUp, install ClickUp for Gravity Forms, connect your ClickUp workspace with OAuth, then add a ClickUp feed to your form: choose the list, write the task name and description with merge tags, and set the status, assignee and due date. Every submission then becomes a task (or a doc) in ClickUp, and the entry gets a link to it.
ClickUp doesn’t talk to Gravity Forms out of the box, and the usual workarounds mean another subscription or a webhook you maintain. So I built an add-on, ClickUp for Gravity Forms, and tested it with real tasks and docs. It’s available to Insider Plus and Elite members in Gravity Ranger Labs.
Why Gravity Forms and ClickUp Don't Connect Out of the Box
ClickUp is a project management tool with tasks, docs, lists and spaces. It has native form integrations for its own ClickUp Forms, but nothing for Gravity Forms. Here are the ways to connect them today:
| Method | What you need | Catch |
|---|---|---|
| Zapier or Make | A Zapier or Make account and the Gravity Forms Zapier Add-On (or a webhook) | Another subscription, and task fields are mapped in Zapier, not in your form settings. |
| Webhooks Add-On | Gravity Forms Elite and a ClickUp personal API token | You build the ClickUp API request yourself: list IDs, assignee IDs, due dates in milliseconds. No doc creation without a second request. |
| Uncanny Automator | Automator Pro for the ClickUp actions | A separate automation plugin to set up and pay for. |
| ClickUp for Gravity Forms | Gravity Forms 2.9.24+, a ClickUp account that can create an OAuth app, and a Gravity Ranger Insider Plus or Elite membership | Beta (1.0.0-beta.5). Tasks map name, description, status, one assignee and due date; custom fields and tags aren’t mapped yet. |
What the Add-On Does
- Creates a task for every submission in the list you choose, with the name and description built from merge tags.
- Sets the status (from the list’s own statuses), the assignee (a workspace member’s username or email) and the due date (a Date field or a fixed date).
- Creates a ClickUp Doc instead, with the submission as its first page, when you switch the feed to Create Document.
- Supports conditional logic and multiple feeds per form, so different submissions land in different lists.
- Runs in the background, so ClickUp never slows down the form.
- Leaves an entry note with a link to the task or doc, and records failures as feed errors.
- Connects with OAuth, no API token to paste. Sites still using a personal token from an earlier beta keep working.
Step 1: Install the Add-On and Connect ClickUp
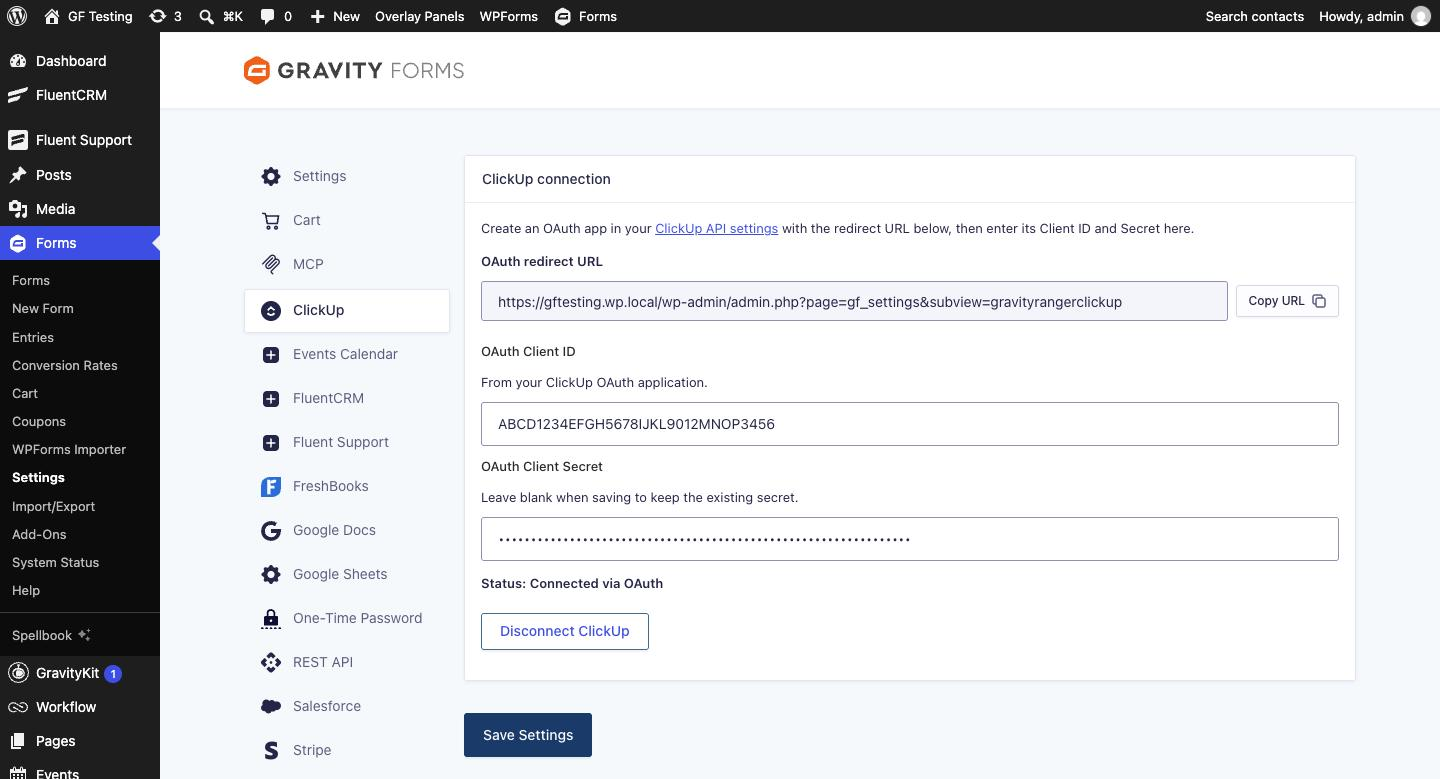
Download the latest build from the ClickUp for Gravity Forms lab (Insider Plus and Elite members), then go to Plugins → Add New → Upload Plugin and activate it. Open Forms → Settings → ClickUp and copy the OAuth redirect URL.
In ClickUp, click your avatar, choose Settings, then Apps (older workspaces say ClickUp API) and the ClickUp API Settings tab. Click Create an App, name it after your site, paste the redirect URL and create it. ClickUp shows a Client ID and a Client Secret: paste both into the add-on, click Save Settings, then Connect to ClickUp and pick the workspace to share.
Step 2: Build the Form
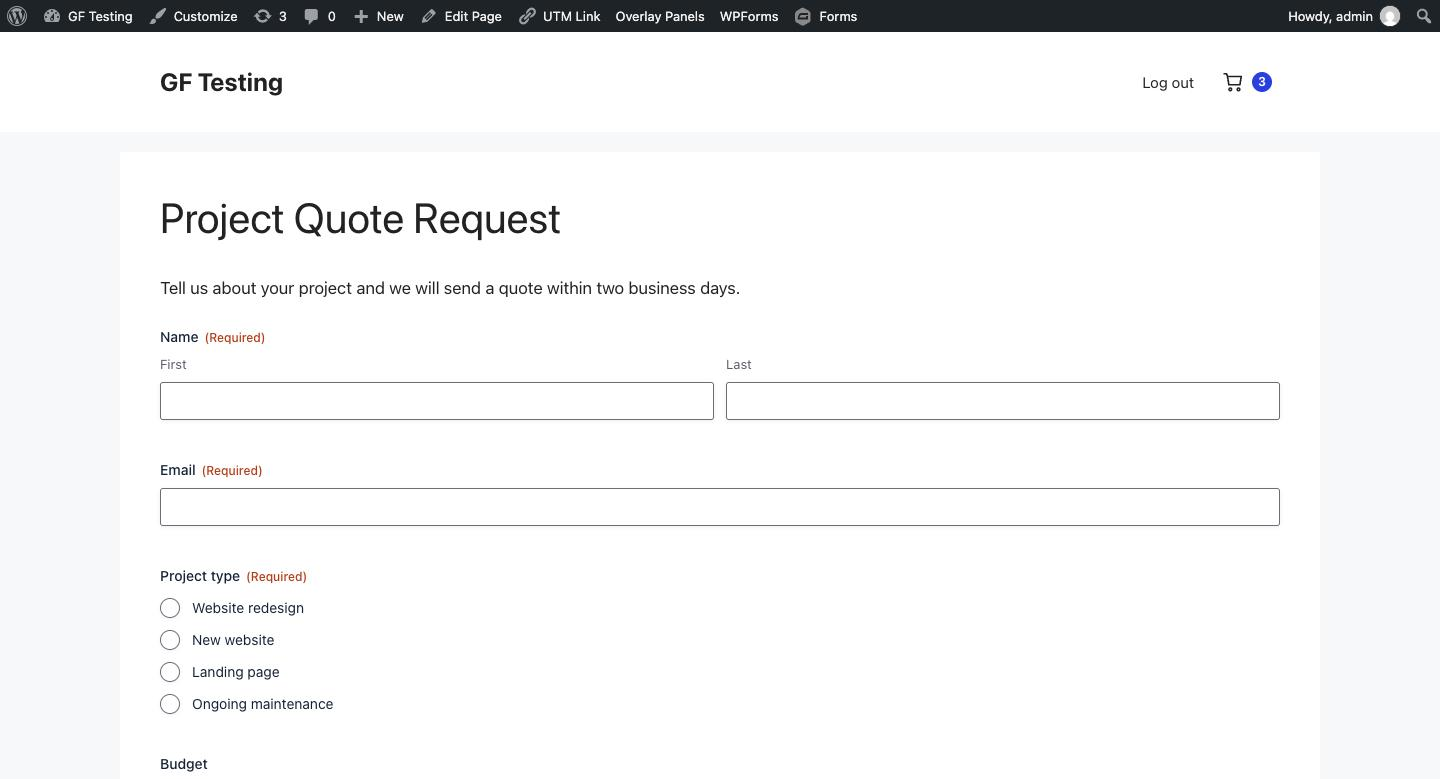
I used a project quote request form for a web agency: name, email, project type (redesign, new site, landing page or maintenance), budget, a target launch date and project details. The Date field is what feeds the task’s due date.
Step 3: Add a ClickUp Feed
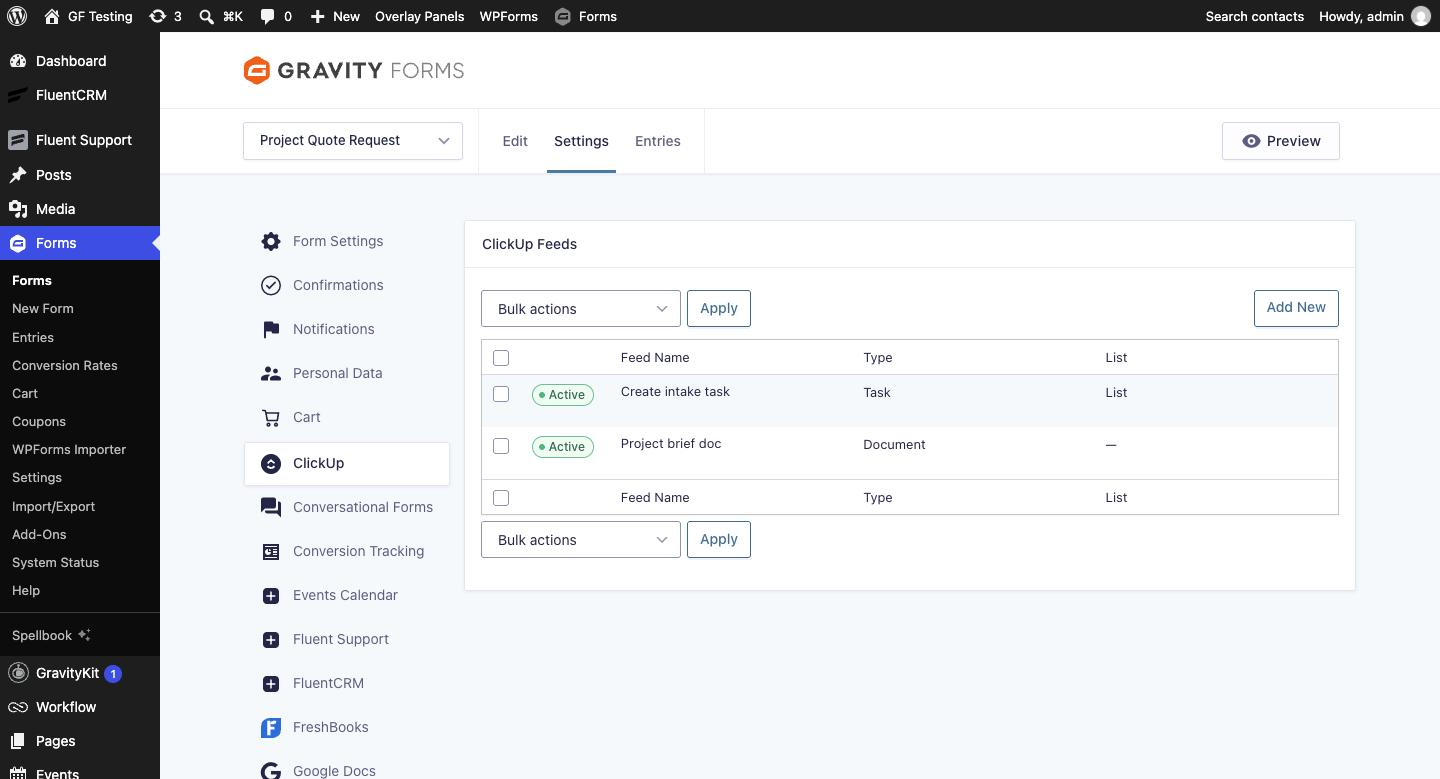
Open the form, go to Settings → ClickUp → Add New and name the feed. Leave Content Type on Create Task, then choose the Workspace, Space and List. Each dropdown loads from ClickUp as you pick, and lists inside folders show as “Folder → List”.
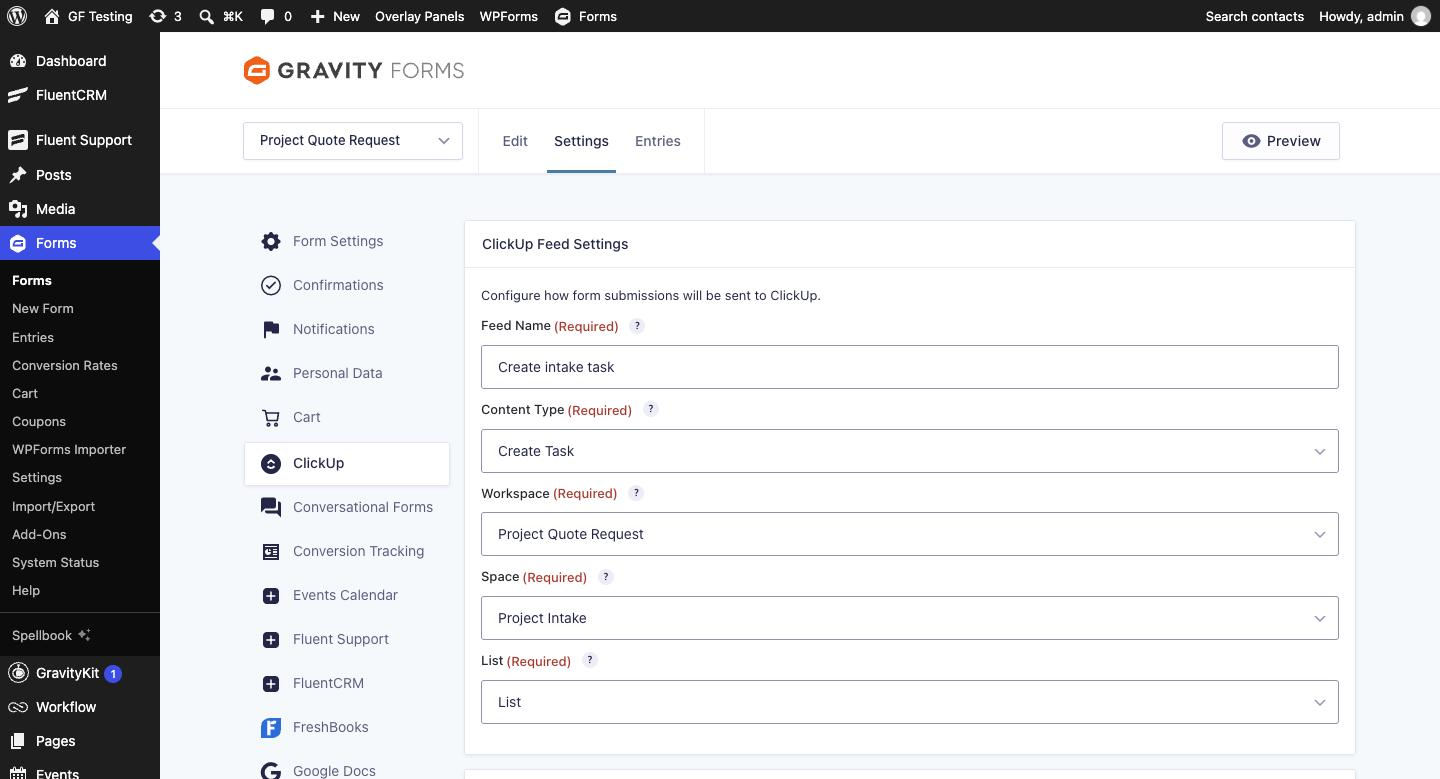
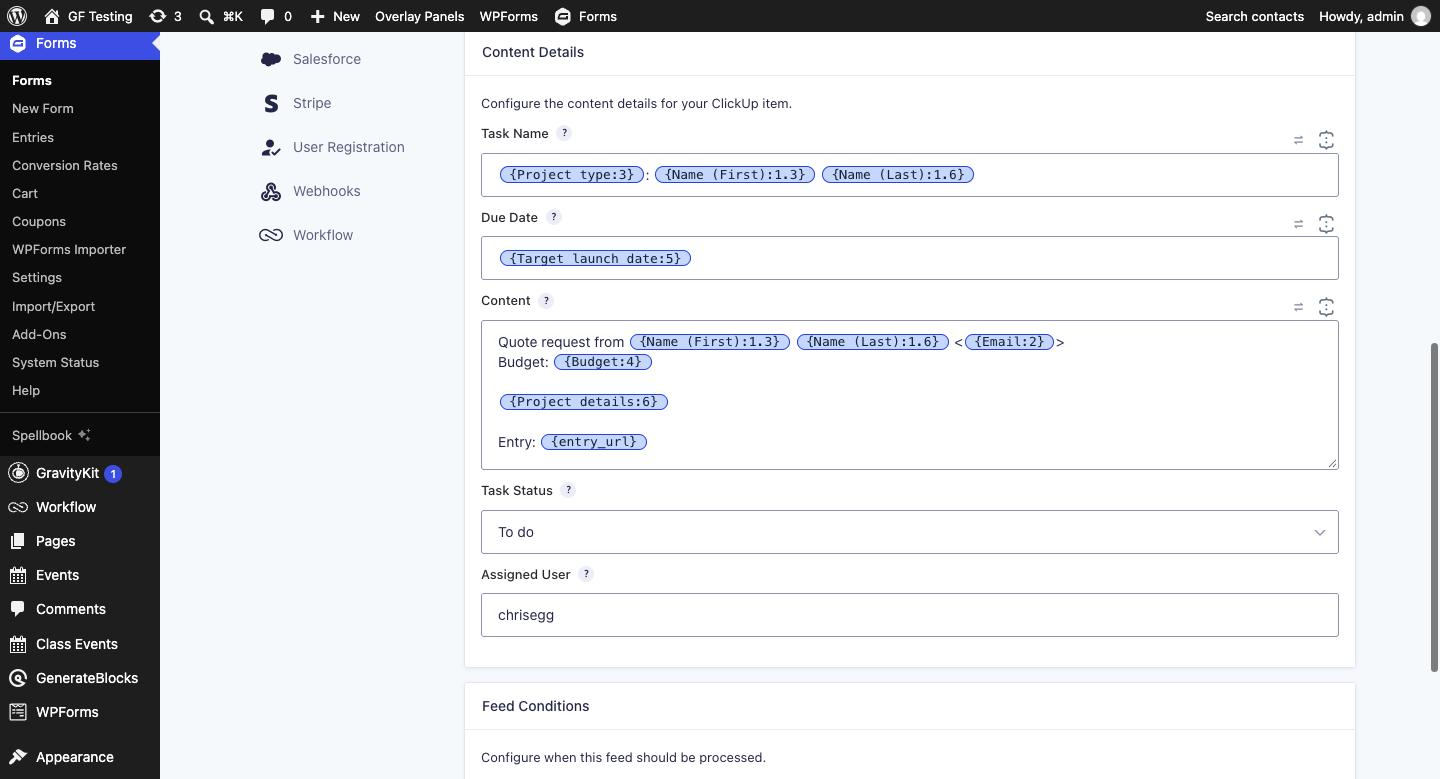
In Content Details, write the Task Name with merge tags. Mine is the project type and the person’s name, so the list reads “Website redesign: Jordan Reyes”. Put the Date field in Due Date, write the Content (this becomes the task description; {all_fields} works too), pick a Task Status from the list’s statuses and type the Assigned User. The add-on checks the username against the workspace as you type.
Step 4: Add a Document Feed With Conditional Logic
For a bigger project I also want a brief in ClickUp Docs. Add a second feed, set Content Type to Create Document, choose the workspace and space, name the doc and use {all_fields} as the content. The doc is created in that space with one page holding every answer.
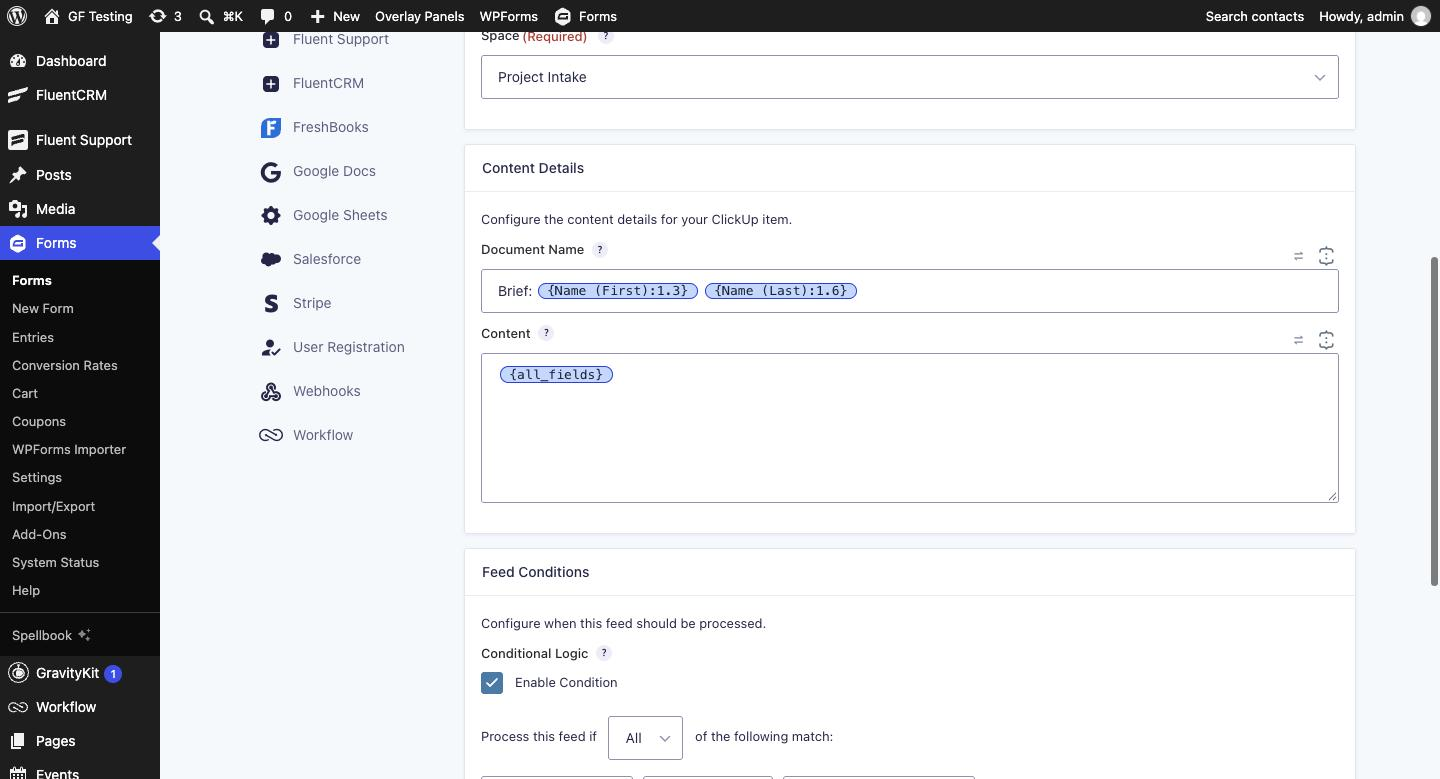
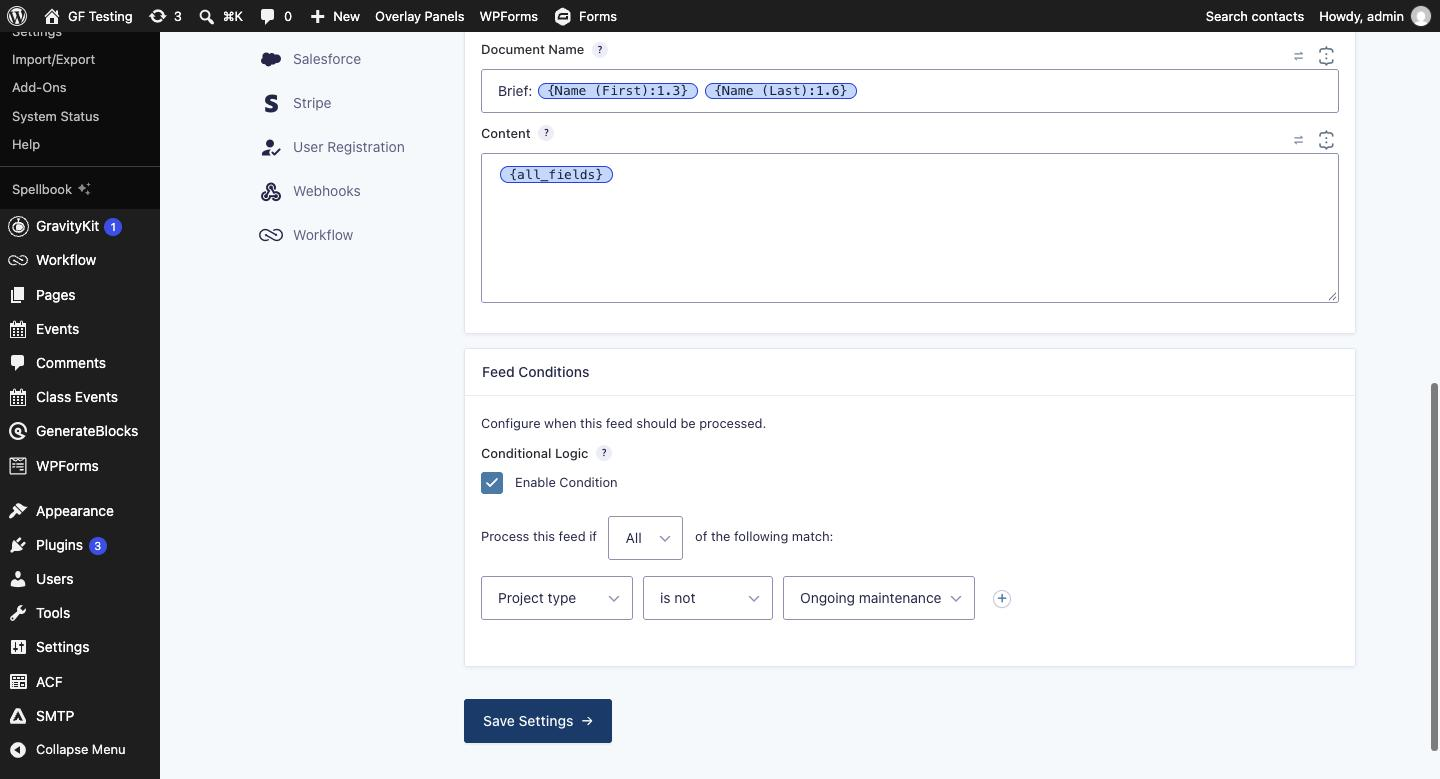
A maintenance request doesn’t need a brief, so this feed has a condition: process it if Project type is not Ongoing maintenance. You can use the same idea to send different project types to different lists, with one task feed per list.
Step 5: Test It
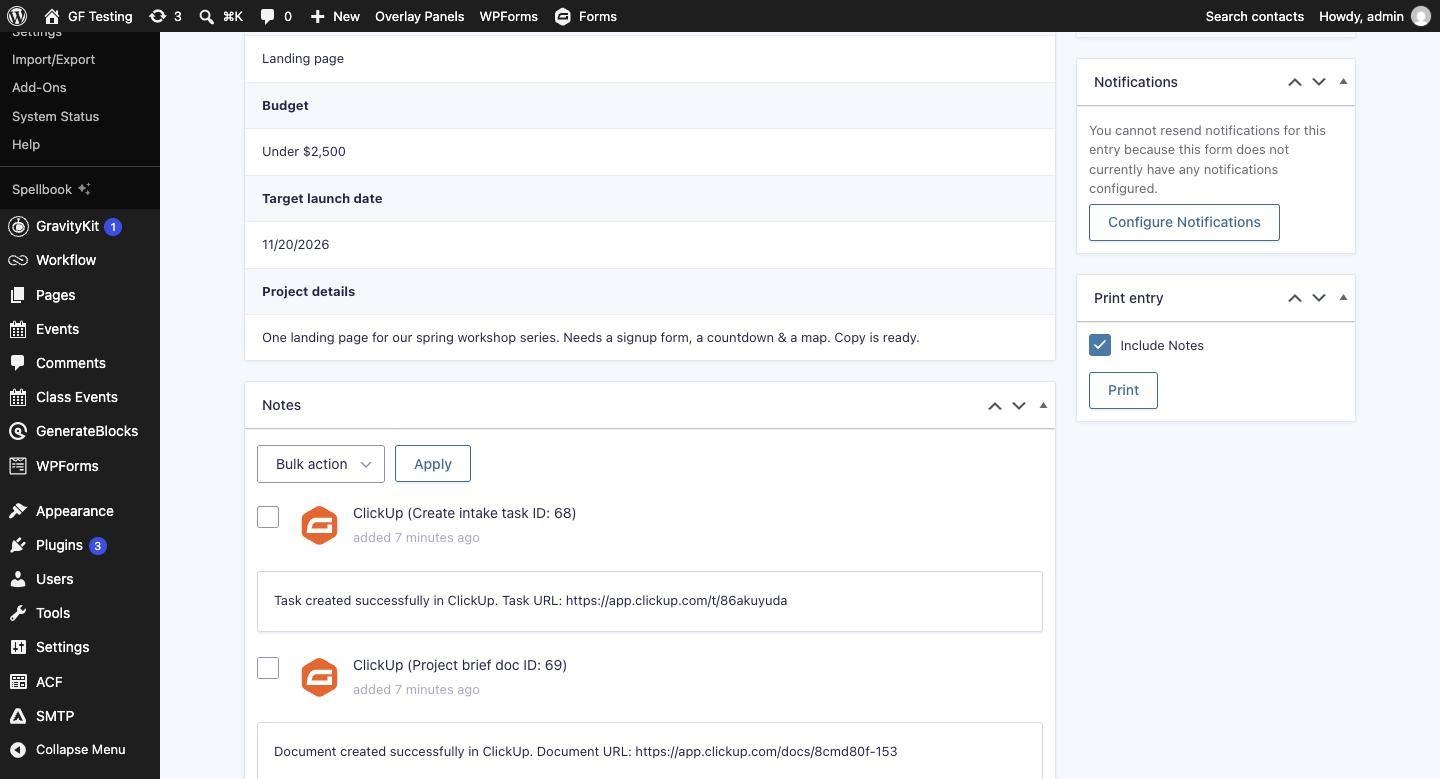
I submitted the form as Priya asking for a landing page due November 20. A few seconds later the entry had two notes, each with a link to what was created:
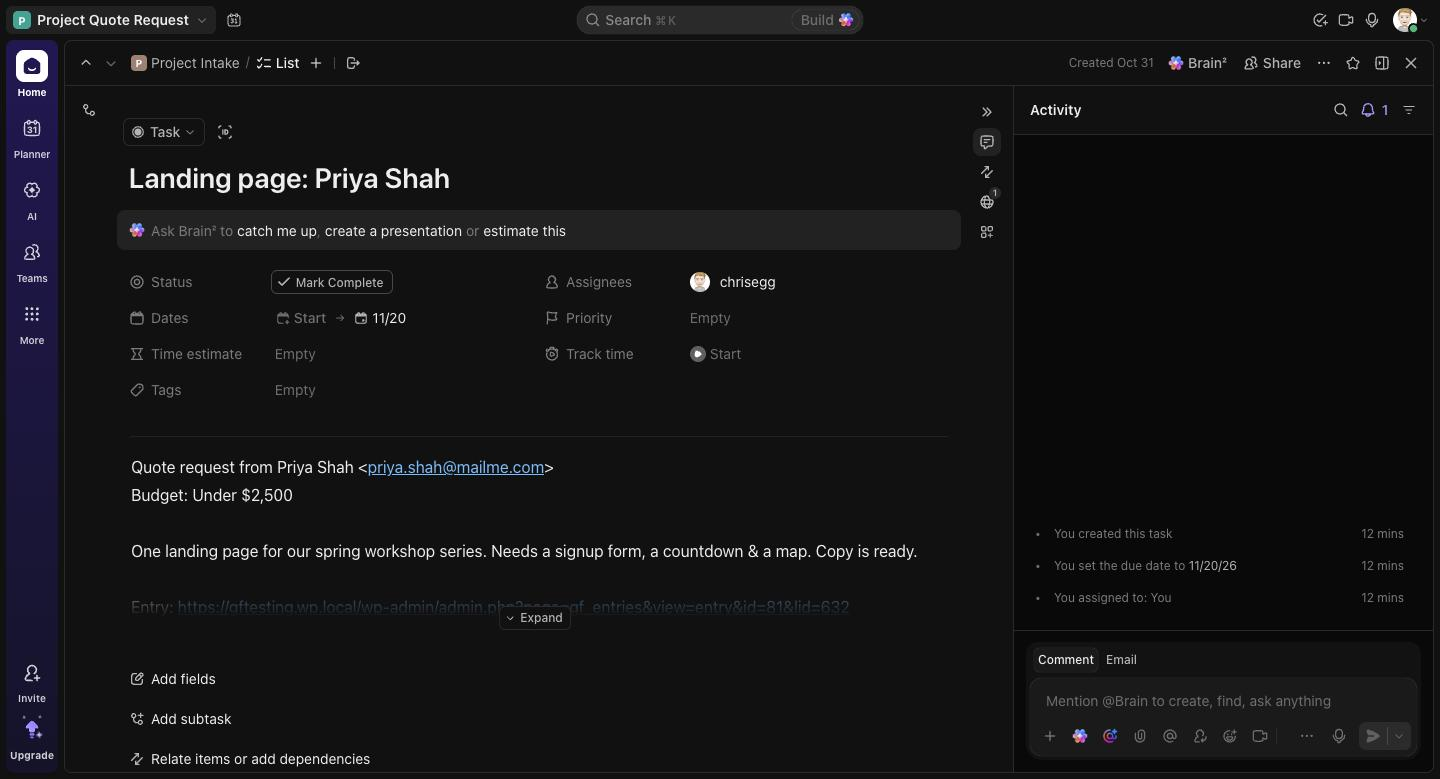
In ClickUp the task sits in the Project Intake list with the status, assignee and due date from the feed, and the description with Priya’s email, budget and details:
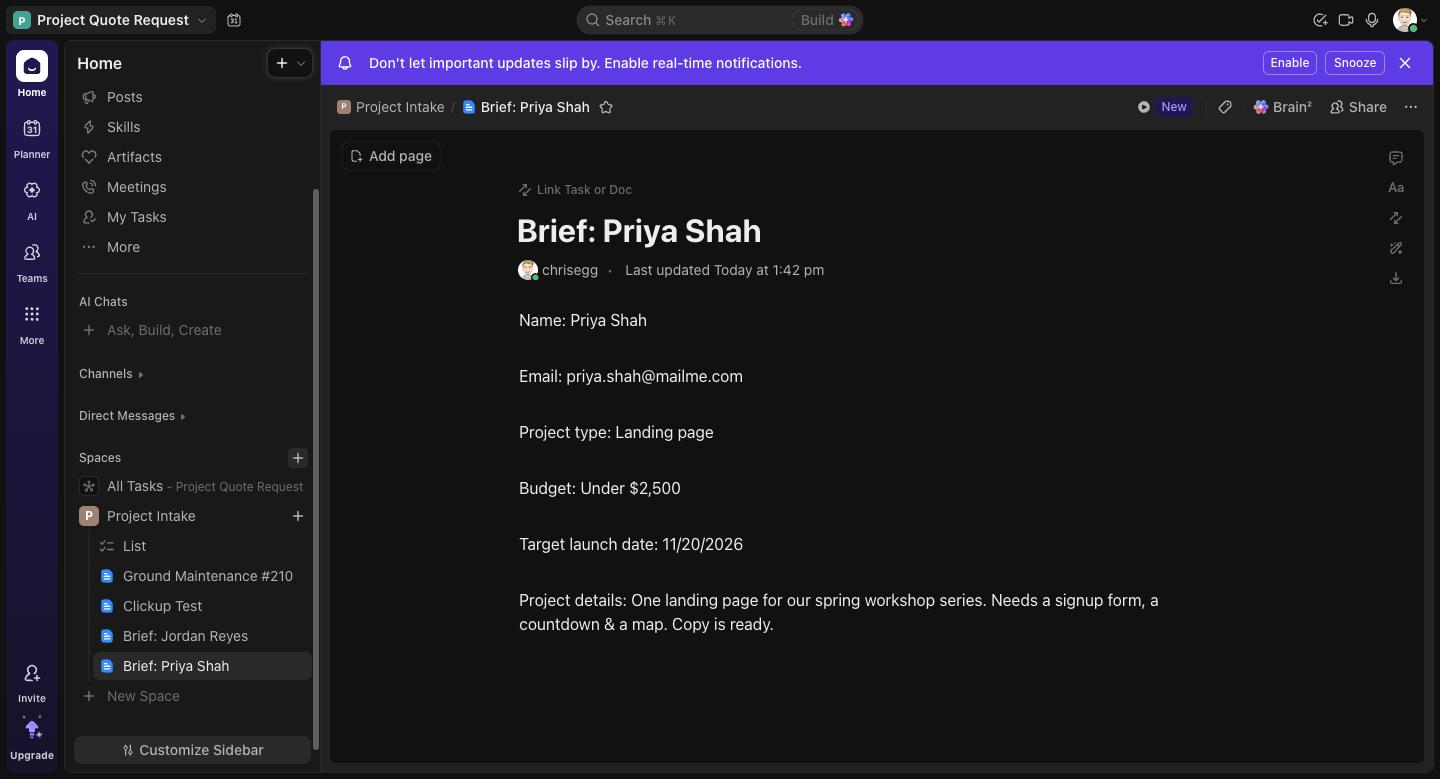
The doc feed created “Brief: Priya Shah” in the same space, with every field on its first page. A maintenance request submitted afterwards created the task only, because the doc feed’s condition didn’t match.
Tip: if nothing shows up in ClickUp, open the entry first. A feed error there, or the ClickUp entry under Forms → Settings → Logging, tells you why.
Things to Know
- One ClickUp connection per site. Every feed uses the same workspace credentials, and you can only pick lists in workspaces you shared when connecting.
- Tasks map the name, description, status, one assignee and the due date. Custom fields, tags, priority, subtasks and attachments aren’t mapped yet; tell me in the lab which ones you need.
- The assignee has to be a member of the workspace (username or email). Guests aren’t matched.
- A due date with no time is due on that calendar day in your site’s timezone.
- Docs are one doc with one page per submission, in plain text.
- ClickUp OAuth tokens don’t expire. If you delete the app in ClickUp, the site shows as disconnected on its next request and you reconnect from the settings page.
- This is a beta (1.0.0-beta.5) in Gravity Ranger Labs. Test it on a staging site first.
Get ClickUp for Gravity Forms
ClickUp for Gravity Forms (1.0.0-beta.5) is a Gravity Ranger Labs project for Insider Plus and Elite members. Download the latest build, follow updates and tell me what to add next.
Frequently Asked Questions
Does ClickUp integrate with Gravity Forms?
Not on its own. ClickUp has no Gravity Forms integration, and Gravity Forms has no ClickUp add-on in its own library today. You can connect them with Zapier or Make, with the Webhooks Add-On and ClickUp's API, or with ClickUp for Gravity Forms from Gravity Ranger Labs, which creates tasks and docs from your form settings.
Does it need a ClickUp API token?
No. It connects with OAuth: you create an app in your ClickUp API settings, paste its Client ID and Secret into the add-on, and click Connect. The add-on can also use a personal API token if you turn that option on with a filter.
Can one form create tasks in different lists?
Yes. Add one feed per list and give each feed conditional logic, for example by project type. Each feed has its own workspace, space, list, status and assignee.
Can it set a due date from the form?
Yes. Put a Date field merge tag in the feed's Due Date setting. The task is due on that day in your site's timezone. A date the add-on can't read is noted on the entry and the task is created without a due date.
What does the document feed create?
A ClickUp Doc in the space you choose, with one page named after the document that holds the feed's content. Using {all_fields} as the content puts every answer on the page.
What happens if ClickUp is down or the feed fails?
Feeds run in the background after the entry is saved, so the person submitting the form never waits on ClickUp. A failure is recorded as a feed error on the entry and in the Gravity Forms log, and the entry is still saved.
Need More Help?
If you still need help, use the chat or leave a comment below and we’ll get back to you.
Comments