
A form is submitted, and then a person has to do the rest: decide who gets the lead, mark it high priority, forward it to the right inbox. Gravity Forms can send notifications with conditional logic, and feeds can push the entry to other apps, but it can’t make a decision, change the entry, and then act on that change. Flowcrafter is a new free plugin from Gravity Wiz that adds a visual workflow builder to Gravity Forms: you drag steps onto a canvas, connect them, and they run on their own after each submission.
Tested November 2026 with Flowcrafter 1.0-beta-1 (released November 6, 2026) on a test site, with Gravity Forms 3.2.2. This is a first look at a beta, so expect things to change. I built a lead-routing workflow for a project request form, submitted two leads, and checked what happened to each one.
What Flowcrafter Does
Every workflow starts with a trigger (a form submission, a schedule, a manual start, or an incoming webhook with GC API Alchemist). After that come nodes, the steps that do the work. Each time the trigger fires you get a run, and Flowcrafter keeps a record of which path every run took and what each step did.
On my test site the node picker listed 34 nodes in five groups:
| Group | Nodes |
|---|---|
| Logic | Condition (entry), Condition (data), Switch |
| Flow | Delay, For Each, Go To, Wait for Payment, Deduplicate, Filter, Group By, Split, Format List, Wait for Approval, Wait for Form Submission |
| Actions | HTTP Request, Send Notification, Send Email, GF Feed, Get Entries, Add Entry Note, Update Entry Field, Update Entry Status, Delete Entry, Set Entry Meta, Copy Entry Fields, Create Entry, PHP Code |
| Confirmation | Confirmation (change the message the visitor sees) |
| Needs another Gravity Wiz plugin | OpenAI Text and OpenAI Image (GC OpenAI); Get Posts, Get Users, Get Database Rows and Get Taxonomy Terms (GP Populate Anything); Webhook Trigger (GC API Alchemist) |
Flowcrafter itself is free. Those last nodes show up in the picker with a short pitch for the plugin that unlocks them.
What You Need
- Gravity Forms.
- WordPress 6.8 or newer and PHP 8.0 or newer.
- Flowcrafter, free from the Flowcrafter page on Gravity Wiz.
Workflows belong to a form. After activating the plugin, open any form and you’ll see a new Workflows tab next to Edit, Settings and Entries. There is also a Workflows row action on the forms list, and a Forms → Workflows page that lists every workflow on the site.
The Example: Route Leads by Budget
My test form is a project request: name, email, company, service, budget (under $2,000, $2,000 to $10,000, or over $10,000) and project details. It also has two admin-only fields, Assigned Team and Priority, that visitors never see. The goal:
- Email every request to the team.
- If the budget is over $10,000, set Priority to High on the entry and email the sales director.
- Otherwise, set Priority to Normal.
You could get part of the way with two conditional notifications, but nothing in Gravity Forms core writes a value back to the entry after submission. That is the piece that makes the Entries list sortable by priority.
Step 1: Create a Workflow
On the form’s Workflows tab, click New Workflow. You get an empty canvas with one card: Add trigger.
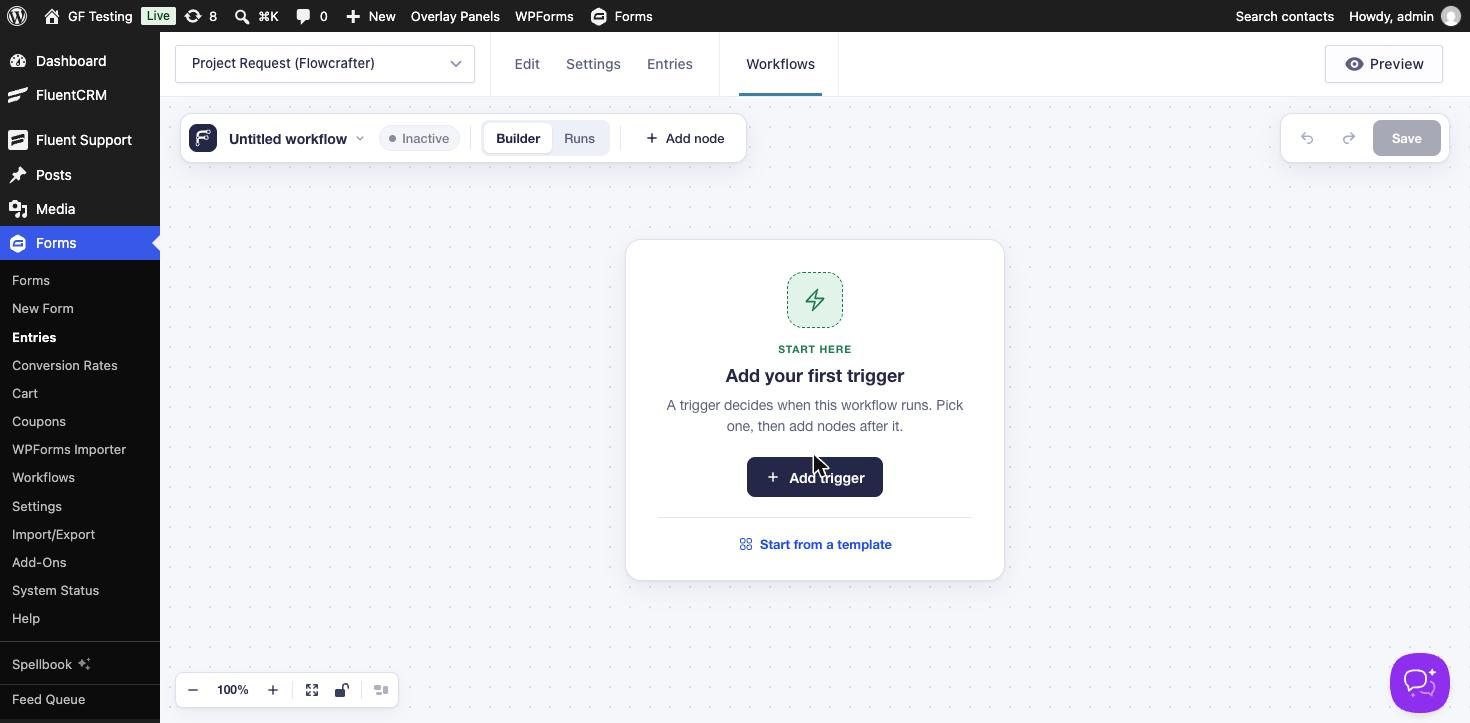
Below the button is Start from a template. The templates are small, working workflows you can preview before using them:
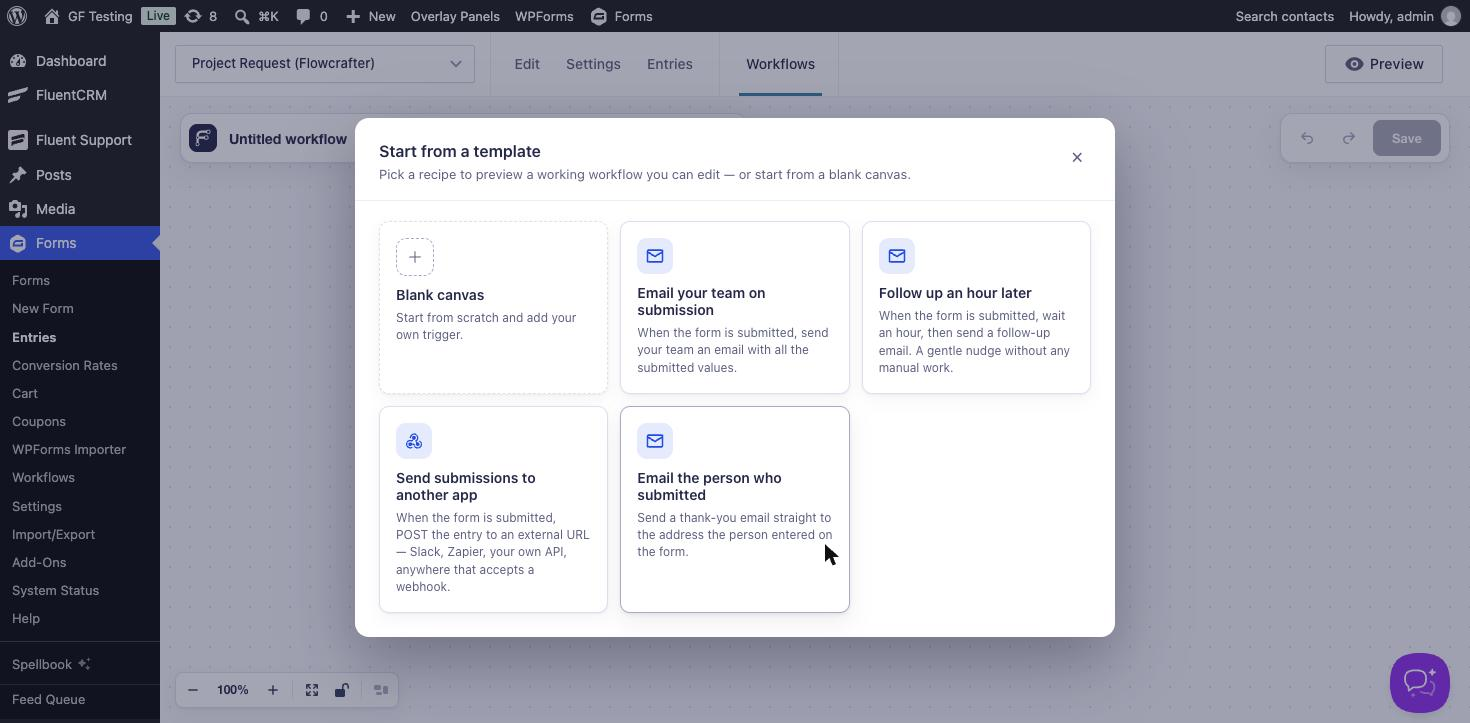
I picked Email your team on submission. It adds a Form Submitted trigger and an “Email the Team” Send Email node whose body is the entry’s {all_fields}. The only thing to change is the recipient, which the template sets to [email protected].
Step 2: Add a Switch
Hover over the last node and click the + on its right edge. The Add a node panel opens with a search box:
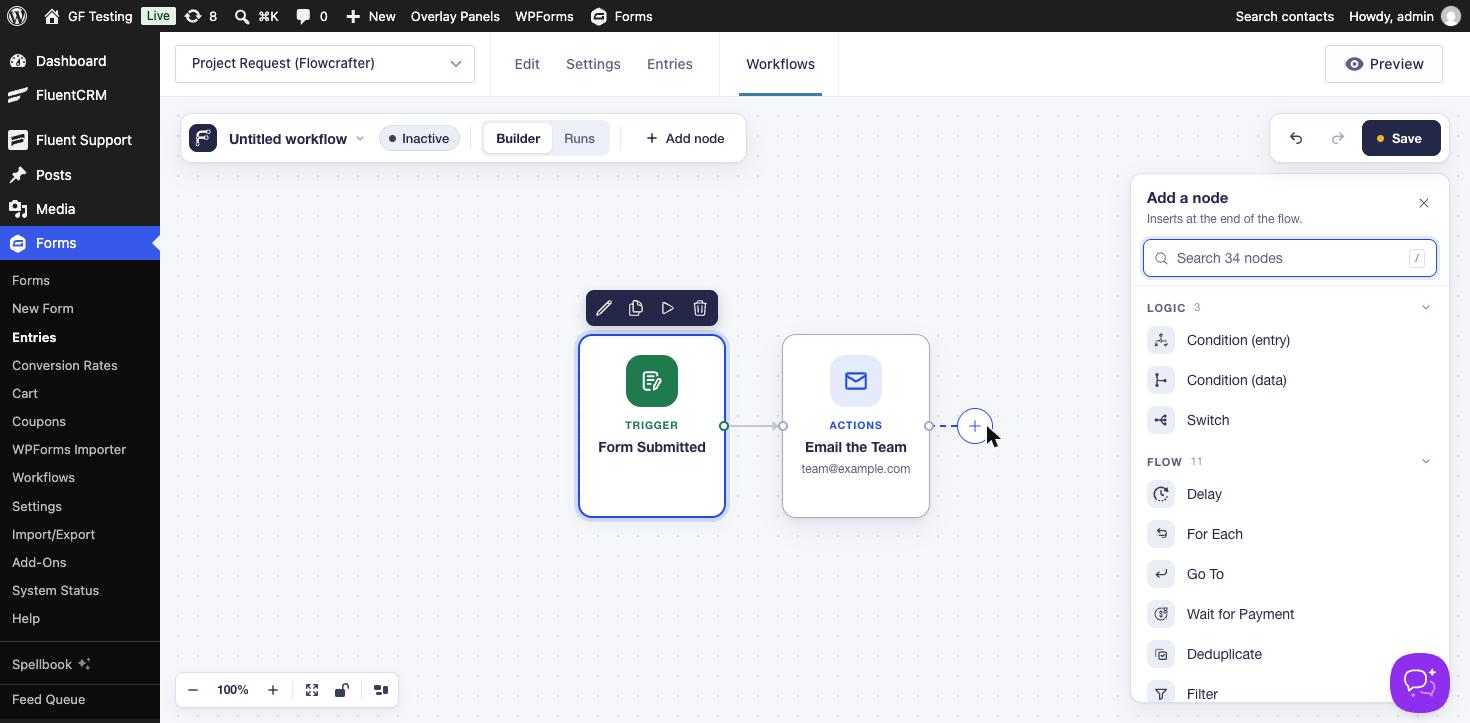
Choose Switch, then click the pencil above it to open its settings. A Switch checks cases from top to bottom and takes the first one that matches. Anything that matches nothing goes down the Default path. Click Add case, give it a label (that label becomes the name of the path on the canvas), and set the condition:
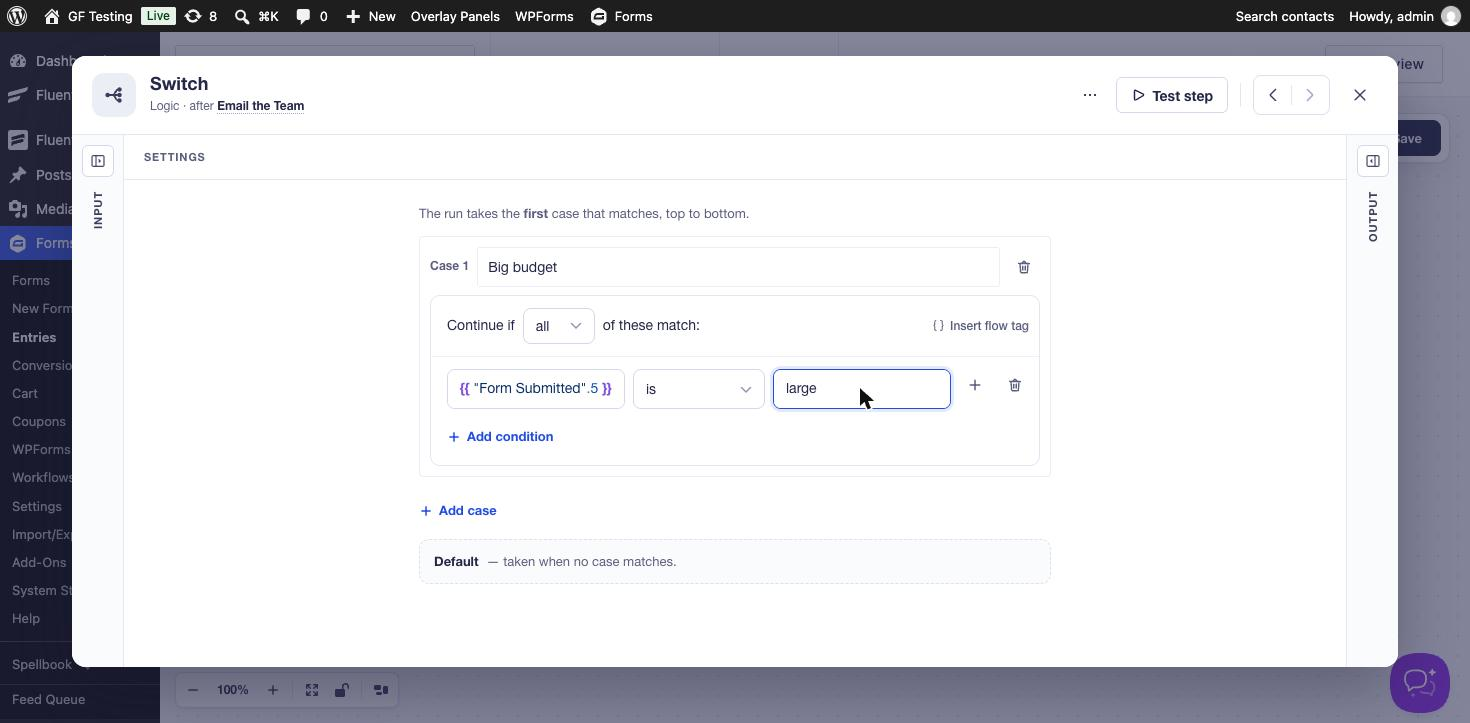
Note that the condition compares the choice value, not the label. My Budget choices have the values small, medium and large, so the case checks for large, not “Over $10,000”.
Flow Tags: How Data Moves Between Steps
The left side of that condition is a flow tag, Flowcrafter’s version of a merge tag. Click Insert flow tag (or type {{ in any field) and pick from everything the earlier steps produced: the trigger’s form fields, and the output of each node before this one.
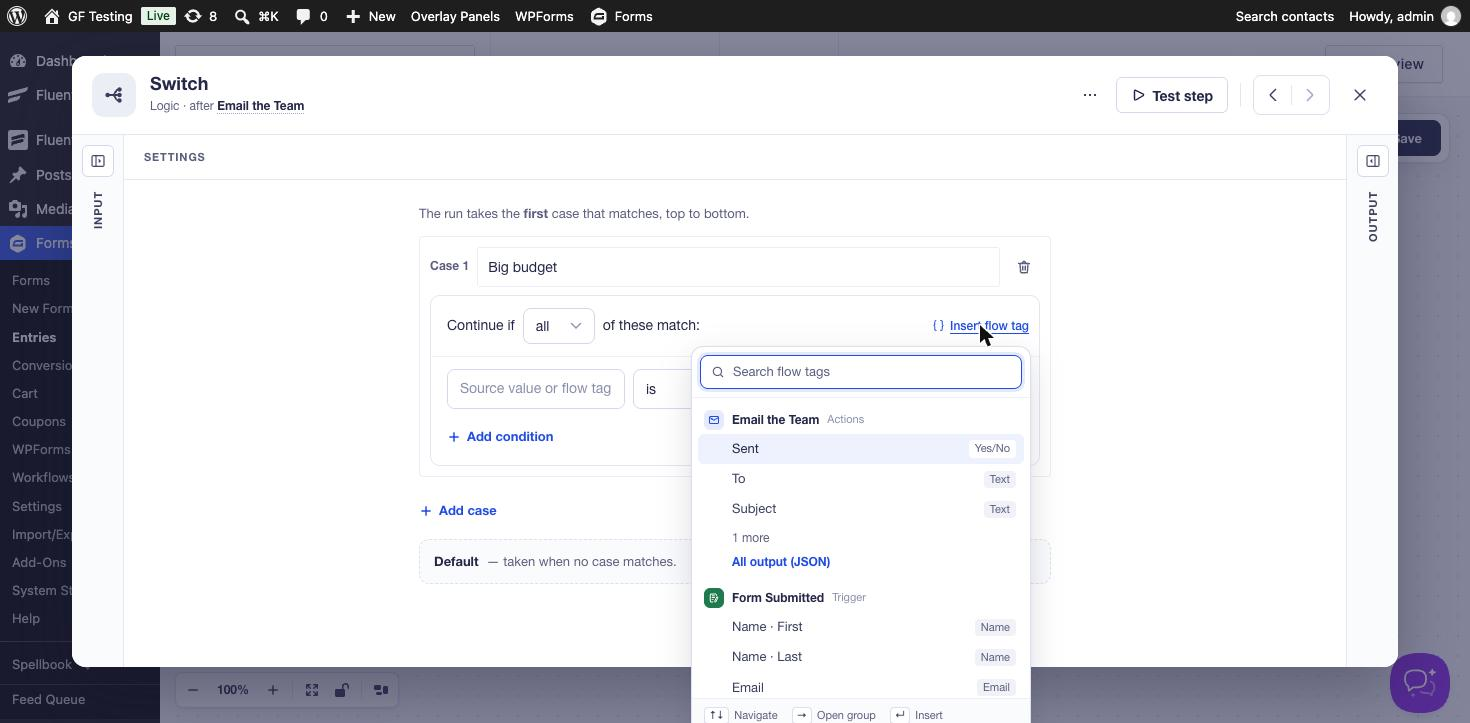
A form field tag looks like this, where 5 is the field ID:
{{ "Form Submitted".5 }}Regular Gravity Forms merge tags still work through a helper. The template’s email body uses this to include every field:
{{ "Form Submitted".mergeTag('{all_fields}') }}Step 3: Update the Entry on the Big Budget Path
Once the case is saved, the Switch has two outputs on the canvas: Big budget and Default. Click the + on the Big budget path and add Update Entry Field. Leave Entry source on Nearest upstream entry (the entry that started the run), choose the Priority field and type High:
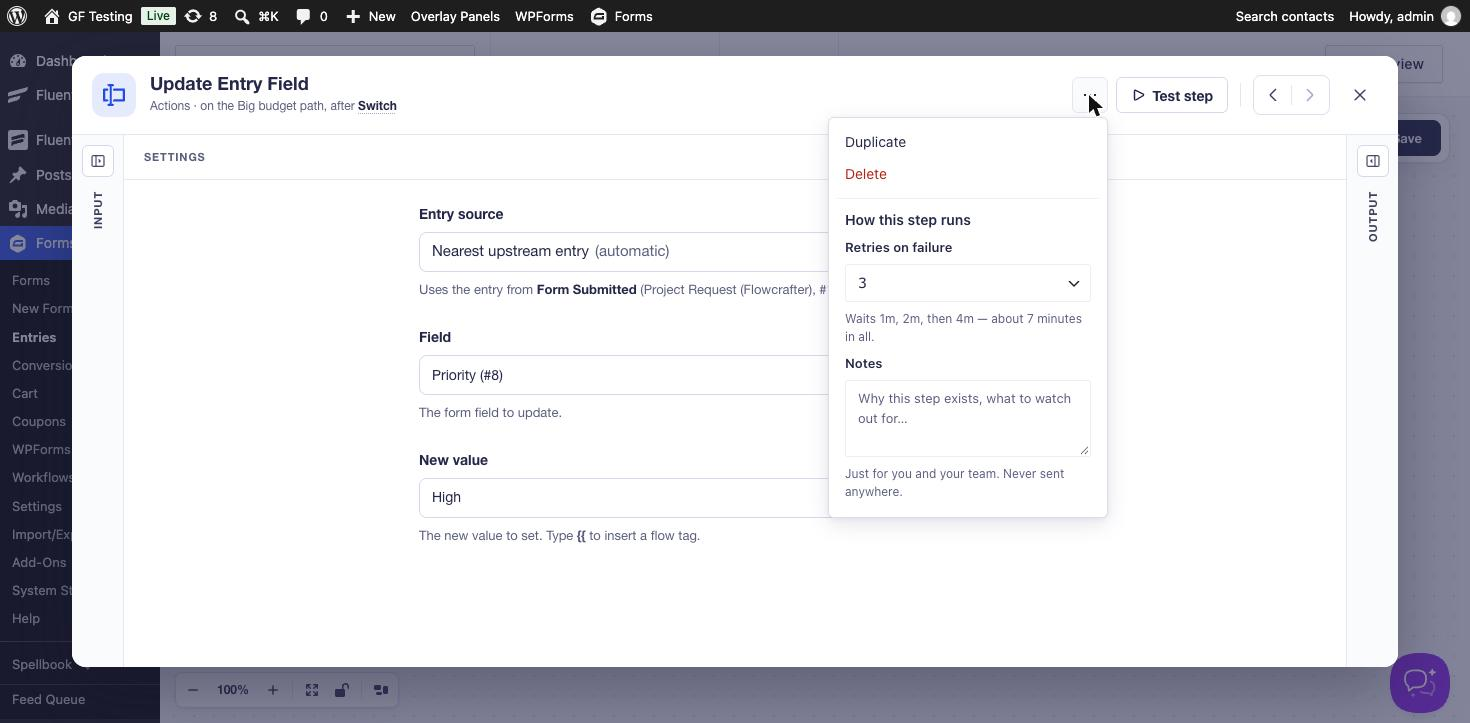
The ⋯ menu at the top of each step is worth knowing about. Retries on failure defaults to 3, waiting 1, 2 and then 4 minutes, which matters most for steps that call outside services. Notes is a place to explain why a step exists; it is never sent anywhere. You can also rename a step by clicking its title. I renamed the Default-path step to “Set Normal Priority” so the canvas reads like a sentence.
Step 4: Email the Sales Director
After Update Entry Field, add a Send Email node. To, Subject and Body all take flow tags:
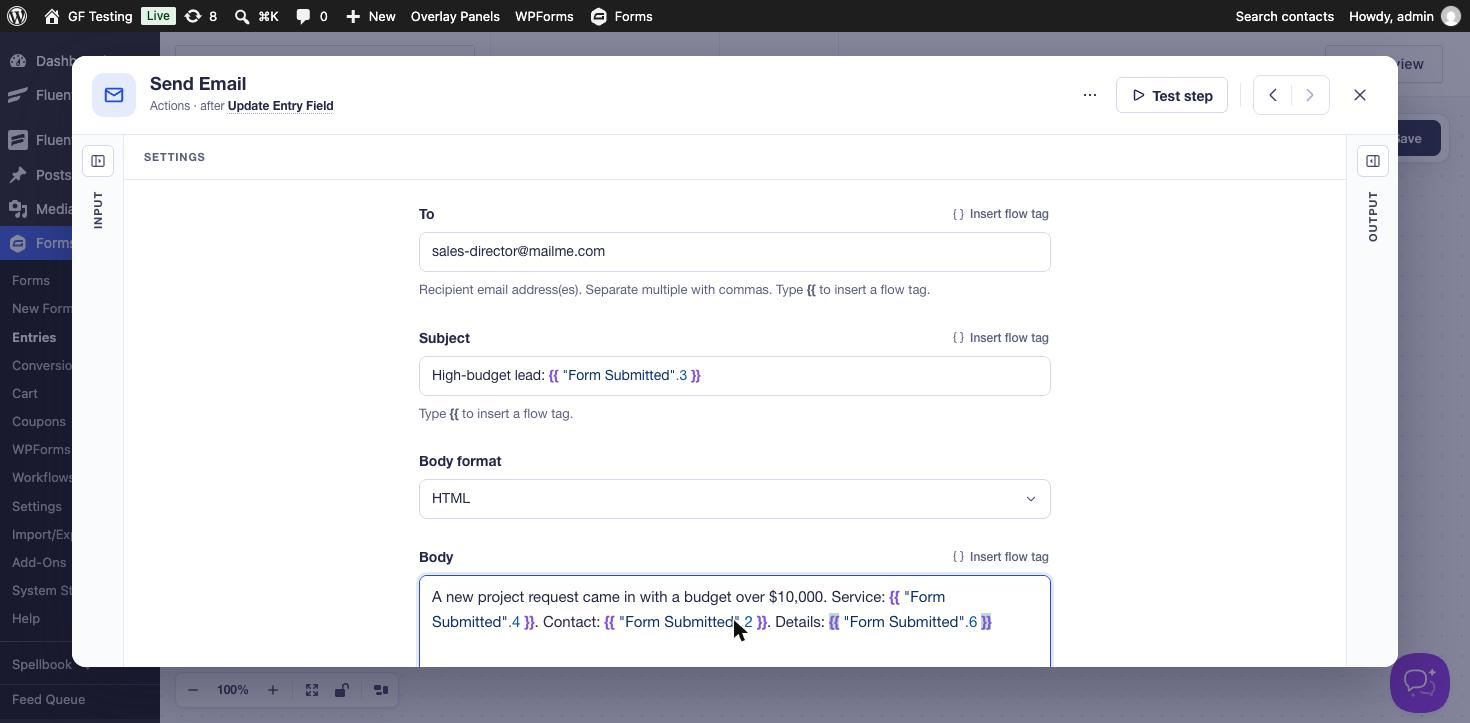
Send Email is for messages that only exist inside the workflow. If you’d rather send a notification you already set up on the form, use Send Notification instead.
Step 5: Finish the Default Path, Save and Activate
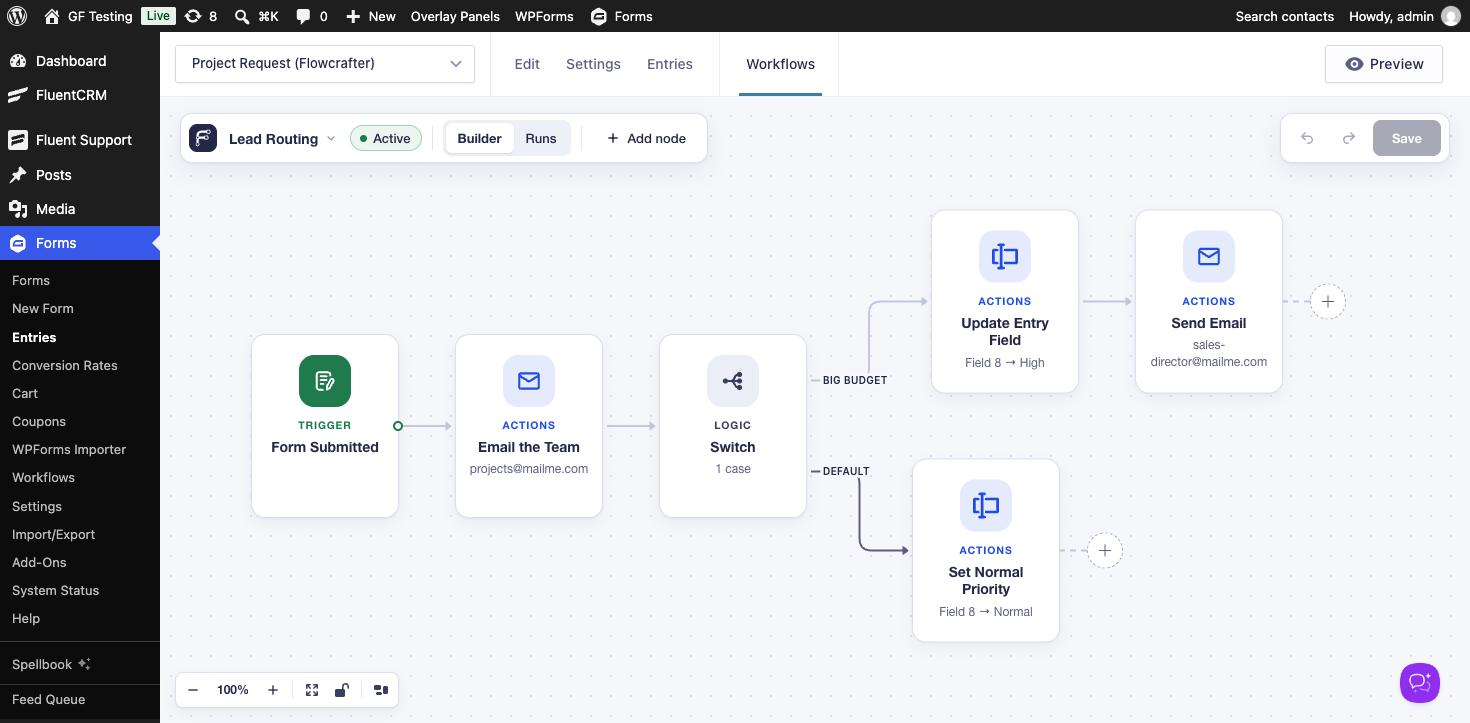
On the Default path add another Update Entry Field that sets Priority to Normal. Rename the workflow from the menu next to its name (I called it Lead Routing), click Save, then click the Inactive pill to switch it to Active. New workflows start inactive, so nothing runs while you are building.
Step 6: Submit a Lead and Watch the Run
I submitted two requests from the front end: Brightline Dental Group with a budget over $10,000, and Becker Landscaping with a budget under $2,000. Then I opened the Runs tab on the workflow.
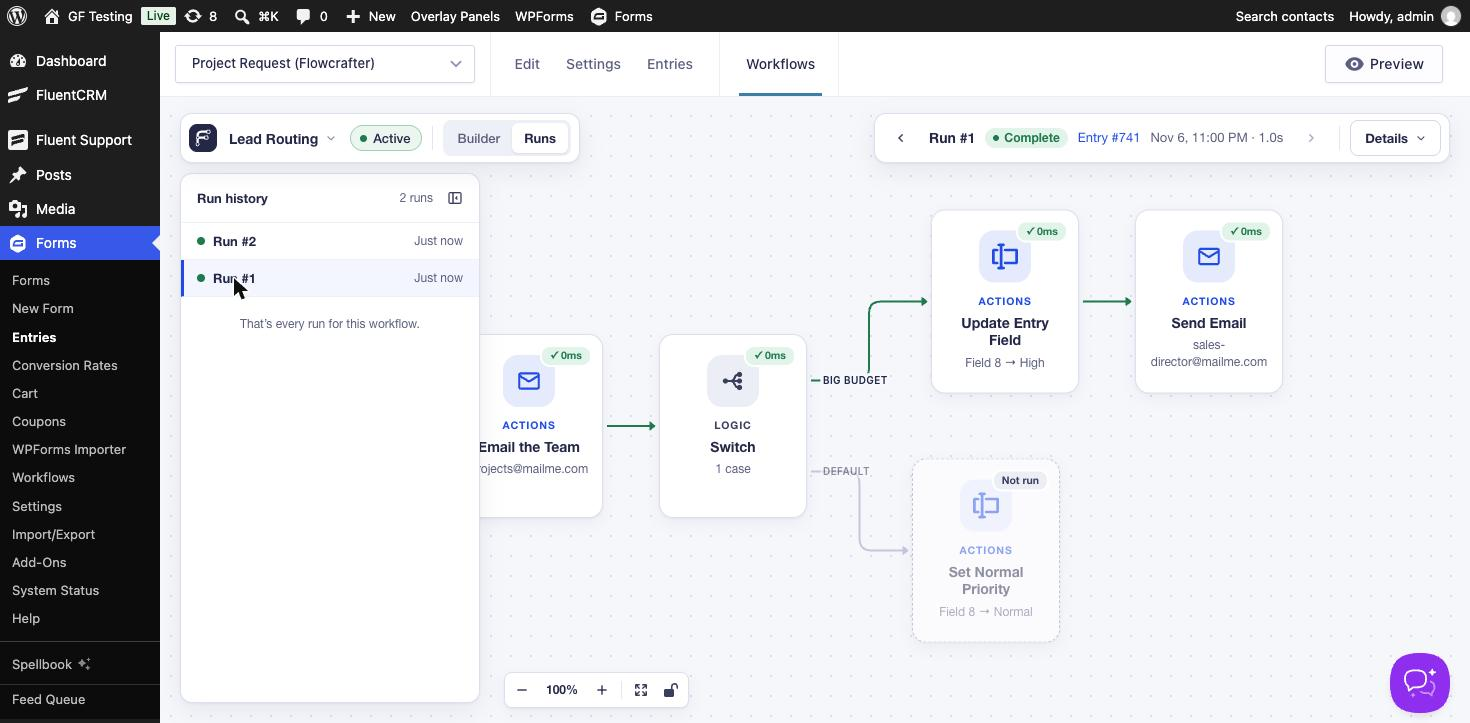
Each run shows the path it took in green, how long each step took, and the entry it belongs to (the entry number links to it). The small-budget lead went the other way:
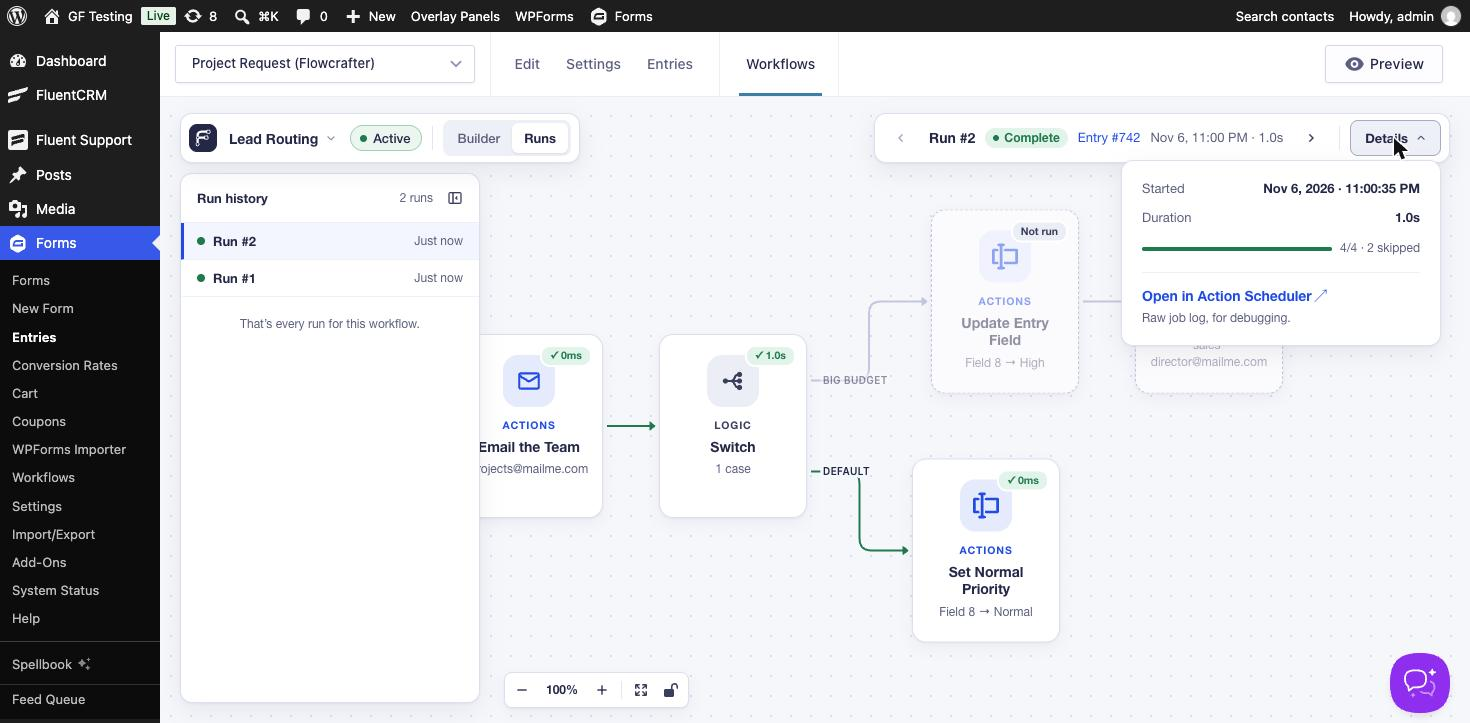
Both entries ended up with the right value in the Priority field (High for entry 741, Normal for entry 742), and the two team emails and the sales director email all went out.
See Exactly What a Step Did
Click any step inside a run to open it read-only, with the data it received on the left and what it produced on the right:
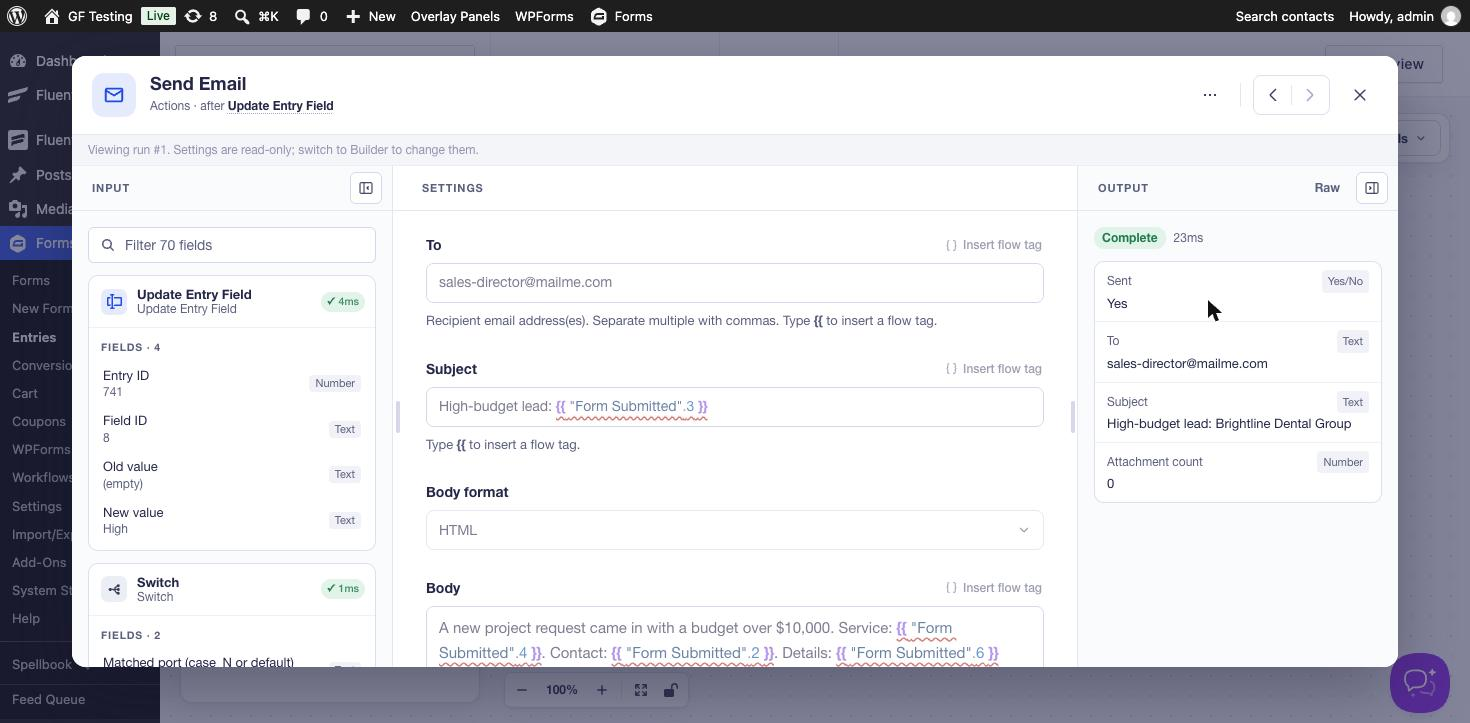
This is the best part of Flowcrafter. When a Gravity Forms notification doesn’t arrive, you usually go hunting through logs. Here you can see the subject that was actually sent, the value the previous step wrote, and which path the Switch picked. There is also a Test step button in the builder, so you can try a single step before activating the workflow.
The Workflows Page
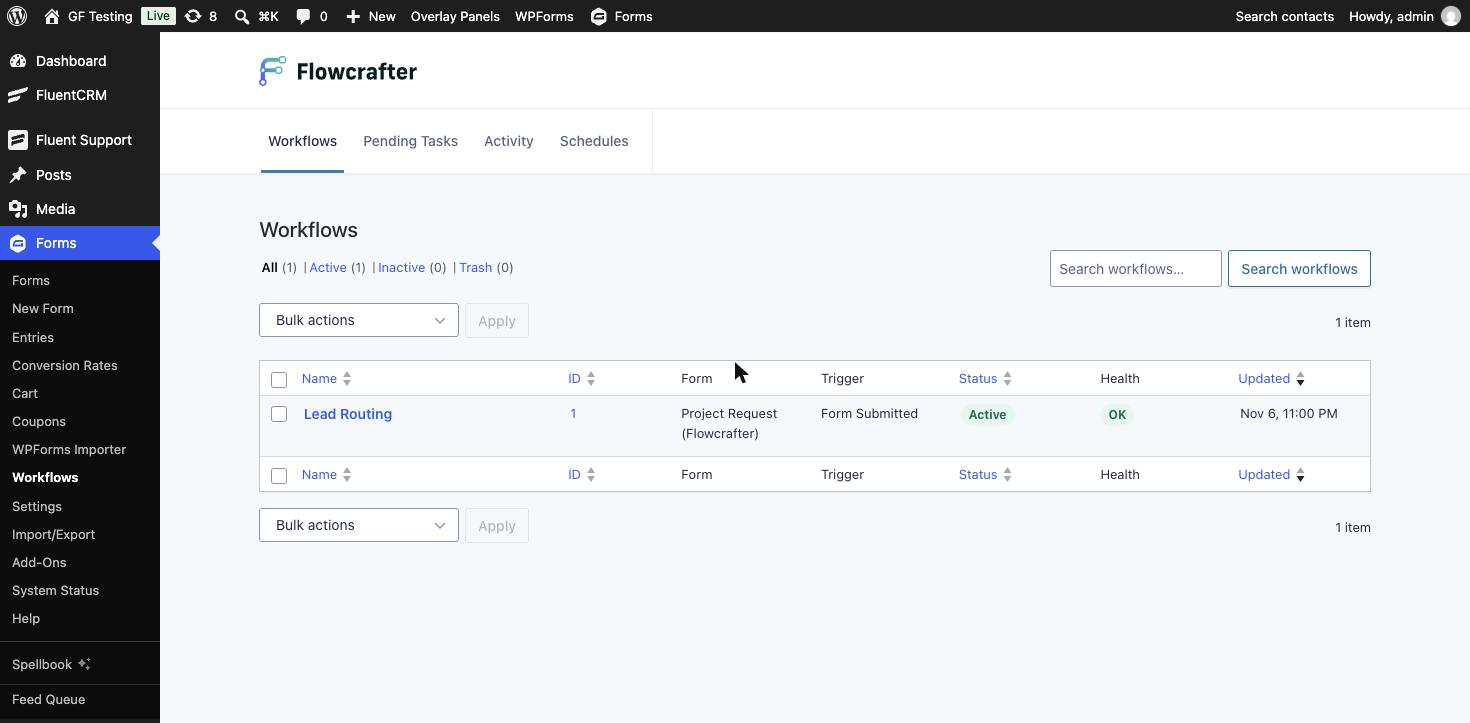
Forms → Workflows lists every workflow on the site, with its form, trigger, status and a Health column. The other tabs are Pending Tasks (approval requests waiting for an answer, with Approve and Reject buttons), Activity (every run, filterable by Running, Complete, Failed and Cancelled) and Schedules (workflows with a schedule trigger).
Other Things It Can Do
I only used five node types. A few of the others that stand out:
- Delay: wait before the next step, like the “Follow up an hour later” template.
- Wait for Approval, Wait for Payment and Wait for Form Submission pause a run until something happens. Wait for Approval emails one or more approvers, with options for first response or all approvers, an expiry and a reminder.
- HTTP Request calls any API, and later steps can use its response through flow tags. Gravity Wiz’s own example looks up a company by email domain and routes the lead by team size.
- GF Feed runs a compatible Gravity Forms feed (Mailchimp, a CRM and so on) at a specific point in the workflow, not just on submission.
- Schedule trigger plus Get Entries, Filter, Group By and For Each for jobs like a daily digest per manager, or moving old entries to the trash.
- PHP Code for anything else. By default only users who can edit plugins can add or change it (the
flowcrafter_php_code_node_capabilityfilter changes that).
Things to Know
- It is a beta. Version 1.0-beta-1 came out the day I tested it. Test workflows on a staging site before you rely on them for real leads.
- Runs happen in the background. Flowcrafter queues each run with Action Scheduler (the Details popover links to the raw job there), so a run starts a moment after the submission, not while the visitor waits. If WP-Cron or loopback requests are broken on a site, runs will be late.
- Switch compares choice values. If you use different values from labels on a drop-down or radio field, check the value.
- One canvas quirk: after I added the first node to a new Switch case, the line from the Switch to that node didn’t show on the canvas. The step header said “on the Big budget path”, and after saving and reloading the line was there.
- Some nodes need other Gravity Wiz plugins. The OpenAI nodes need GC OpenAI and the Webhook trigger needs GC API Alchemist. The Get Posts, Get Users, Get Database Rows and Get Taxonomy Terms nodes come with GP Populate Anything; on my test site they were still locked with Populate Anything 2.1.79 active, so they probably need a newer Populate Anything release.
- Workflows are per form. Each one lives on the form whose submission (or entries) it uses.
How It Stacks Up Against Gravity Flow
The obvious question for anyone who already uses Gravity Flow: is Flowcrafter a replacement? Both say “workflow”, both live on top of Gravity Forms, and both were active on my test site at the same time without getting in each other’s way. But they answer different questions. Gravity Flow asks who has to do something with this entry next? Flowcrafter asks what should happen automatically after this entry comes in?
| Flowcrafter | Gravity Flow | |
|---|---|---|
| Price | Free (some nodes need paid Gravity Wiz plugins) | From $99 a year for one site; $299 (3 sites) and $447 (50 sites, all extensions). Each license includes a first-year Gravity Forms Starter license |
| Maturity | 1.0 beta, released November 2026 | Established; version 3.1.2 on my test site |
| Building | Drag-and-drop canvas, branches drawn as paths | A list of steps in the form settings, each with its own conditions and “next step” choices (a visual flowchart is an extension, included from the Pro license) |
| Built around | Automation: data, branching, timing | People: assignees, inbox, approvals, user input |
| Starts on | Form submission, a schedule, a manual start, or a webhook (with GC API Alchemist) | Form submission or payment received; incoming webhooks with an extension |
| Approvals | Wait for Approval emails approvers and waits; admins can also answer on the Pending Tasks tab | Approval step assigned to users, roles or a field, with reminders, expiration and approve/reject routing; assignees work from an inbox |
| People editing the entry | No step for a person to fill in or edit fields | User Input step: an assignee edits chosen fields, also on the front end |
| Changing the entry automatically | Built in: update a field, status or meta, add a note, copy fields, create or delete entries | Mostly through the Form Connector extension (Update Fields, Update an Entry, New Entry, Delete an Entry) |
| Other add-ons | GF Feed node runs a compatible feed | Feed steps for about 40 add-ons (Mailchimp, HubSpot, Salesforce, User Registration, Zapier and more) |
| Calling APIs | HTTP Request, and later steps can use the response | Outgoing Webhook step |
| Many entries at once | Get Entries, Filter, Group By, For Each, on a schedule (digests, cleanup) | No; each workflow runs for one entry |
| Front end | None | [gravityflow] shortcode for the inbox, status and submit pages, plus reports |
| What you can see afterwards | Run history on the canvas, with every step’s input and output | Workflow box and timeline on the entry, status page and reports |
Pick Gravity Flow When People Are Part of the Process
Expense approvals, HR onboarding, contract review, anything where a named person (or role) has to look at the entry, add information and pass it on. Gravity Flow’s assignees, inbox, reminders and User Input step are the reason to use it, and Flowcrafter has nothing like them yet. Its Wait for Approval node is fine for a quick yes or no by email, but the approver can’t edit the entry or see a queue of their own tasks.
Pick Flowcrafter When the Process Runs by Itself
Lead routing, follow-ups after a delay, sending an entry to an API and saving the answer, daily digests, cleaning up old entries. Flowcrafter does these out of the box, for free, and the run history makes them easy to debug. In Gravity Flow you would need extensions (or code) for most of them, and there is no way to work on a list of entries on a schedule.
Or Use Both
They don’t have to compete. A form can have a Gravity Flow workflow for the approval chain and a Flowcrafter workflow that does the automatic housekeeping around it: tagging the entry, calling a CRM, emailing a summary. Just keep the two from doing the same job, like both sending the same notification. Since Flowcrafter is a beta, that split is also the safer way to try it: leave the people part in Gravity Flow and move the automation over first.
Alternatives
- Gravity Flow is the established workflow add-on for Gravity Forms, built around people: assignees, approvals and user input. See the comparison above.
- Conditional notifications and feeds in Gravity Forms core handle simple “if this, email that” without another plugin. You can’t change the entry or chain steps with them.
- Zapier, Make and Uncanny Automator can do branching automations too. Zapier and Make run off-site and charge per task; Automator runs in WordPress but isn’t specific to Gravity Forms. Flowcrafter keeps everything on your own site and works with entries directly.
Who Should Try It
Anyone who has stacked up conditional notifications and snippets to get one form to do several things in order. Lead routing, follow-ups after a delay, digests, and “send it to this API and save the answer on the entry” are all things that used to need custom code. Agencies will like the run history most: when a client asks why a lead didn’t get an email, the answer is one click away. Since it is a free beta, try it on a staging copy of a real form and see how much of your custom code it replaces.
Frequently Asked Questions
What is Flowcrafter for Gravity Forms?
Flowcrafter is a free plugin from Gravity Wiz that adds a visual workflow builder to Gravity Forms. You connect a trigger, such as a form submission or a schedule, to steps like conditions, delays, emails, entry updates and API calls, and they run automatically.
Is Flowcrafter free?
Yes. The plugin is free. A few nodes need other Gravity Wiz plugins: the OpenAI nodes need GC OpenAI, the Webhook trigger needs GC API Alchemist, and the Get Posts, Users, Database Rows and Taxonomy Terms nodes come with GP Populate Anything.
Where do I find Flowcrafter in Gravity Forms?
Open a form and click the Workflows tab next to Edit, Settings and Entries. Forms, Workflows lists every workflow on the site, with tabs for pending tasks, activity and schedules.
Can Flowcrafter update a Gravity Forms entry after submission?
Yes. The Update Entry Field node changes a field on the entry, and there are also nodes to update the entry status, set entry meta, add a note, copy fields and create or delete entries.
What is the difference between Flowcrafter and Gravity Flow?
Gravity Flow is built around people: assignees, approvals, user input steps and an inbox. Flowcrafter is built around automation: branching, delays, API calls, lists of entries and schedules, with a visual canvas and a run history for each submission.
What are flow tags in Flowcrafter?
Flow tags pass data between steps, like merge tags. {{ "Form Submitted".5 }} is field 5 of the submitted entry, and every earlier step's output is available the same way. Gravity Forms merge tags work through the mergeTag helper.
Does Flowcrafter run workflows in the background?
Yes. Runs are queued with Action Scheduler, so they start a moment after the submission instead of slowing down the form.
Need More Help?
If you still need help, use the chat or leave a comment below and we’ll get back to you.
Comments